
Wire an inverter with properly sized positive and negative cables to a battery matching its voltage, a fuse and disconnect close to the positive terminal, and grounded equipment. On a 12 V battery, a 2,000 W inverter can pull close to 200 amps, so the cables, fuse, and connections matter more than the inverter itself. Use a transfer switch for any house wiring.
Quick answer
Match battery voltage to the inverter. Size the cables and fuse for at least 125% of the inverter’s maximum DC current. Fuse the positive cable near the battery, check polarity twice, and ground the chassis. Never plug an inverter into a wall outlet or panel without a transfer switch.
- Best for vehicles and RVs: short, thick cables and a fuse at the battery
- Best for big loads: a 24 V or 48 V bank to cut current
- Battery voltage must match the inverter’s DC voltage.
- Find DC amps by dividing inverter watts by efficiency, then by battery volts.
- Size the cable and fuse to at least 125% of maximum inverter current.
- Put the fuse as close to the battery positive terminal as practical.
- Equipment grounding wires do not carry normal current. They are a safety path.
- A house panel needs a listed transfer switch or approved interconnection to stop backfeed.
- De-energize everything before you touch a wire.
- How Do You Wire an Inverter to a Battery?
- Does the Battery Voltage Have to Match the Inverter?
- What Size Wire Do I Need for an Inverter?
- Worked Example: 2,000 W on 12 V
- Where Should the Inverter Fuse Be Installed?
- How Should the Inverter Be Grounded?
- How Do I Connect an Inverter to Solar Panels?
- Can I Connect an Inverter to a House Panel?
- Cable Routing, Terminals, and Strain Relief
- What Happens If Wiring Is Wrong?
- Printable Pre-Energization Checklist
- Frequently Asked Questions
How Do You Wire an Inverter to a Battery?
You connect the inverter’s DC positive to the battery positive through a fuse and disconnect, and its DC negative to the battery negative. Then you ground the chassis. Every other detail is about doing those three things safely.
Here is the basic order for a vehicle or RV:
Battery (+) --[Fuse/Breaker]--[Disconnect]-- Inverter (+)
Battery (-) ------------------------------- Inverter (-)
Inverter ground lug ---- chassis / system ground
- Turn the inverter off. Open the disconnect and remove the fuse.
- Check the labels. Red or + is positive. Black or – is negative.
- Connect the inverter end first. Attach the cables to the inverter with the fuse still out.
- Connect the battery end. Negative goes on, then positive through the fuse holder.
- Install the fuse last. Expect a small spark when the inverter’s input capacitors charge. Many inverter makers sell a pre-charge step for this reason.
- Add the ground. Follow the manual for the ground lug.
- Switch on and test with a small load first.
Does the Inverter Battery Voltage Have to Match the Inverter Voltage?
Yes. Victron states that the battery bank voltage must match the inverter or inverter/charger DC voltage, so a 24 V unit needs a 24 V bank (see the Victron wiring manual). A wrong-voltage battery will either not start the inverter or damage it.
Higher voltage also means lower current for the same power. That means thinner cables, less heat, and less voltage drop. The numbers below assume a 2,000 W output and 85% efficiency, which is a common planning figure. Your inverter’s data sheet gives the real value.
| System voltage | DC input power | Approx. DC current | Typical use |
|---|---|---|---|
| 12 V | about 2,353 W | about 196 A | Vehicles, small RVs, boats |
| 24 V | about 2,353 W | about 98 A | Larger RVs, small cabins |
| 48 V | about 2,353 W | about 49 A | Off-grid homes, backup banks |
Doubling the voltage cuts the current in half. That is why most inverters above about 2,000 to 3,000 W are built for 24 V or 48 V.
What Size Wire Do I Need for an Inverter?
The wire must carry the maximum DC current without overheating, and it must keep voltage drop low over the full cable length. Both checks must pass. Ampacity alone is not enough.
How do I calculate inverter cable size from watts, volts, efficiency, and cable length?
- DC input watts = inverter output watts ÷ efficiency.
- DC amps = DC input watts ÷ battery volts.
- Design current = DC amps × 1.25. Victron advises sizing DC conductors and overcurrent devices to at least 125% of the inverter’s maximum current rating.
- Pick a cable whose ampacity is at or above the design current, using the temperature rating of the insulation and terminals.
- Check voltage drop = amps × cable resistance × total round-trip length. Many installers aim for 2% or less on the DC side. Your inverter manual may set a stricter limit.
Use the inverter’s peak or low-battery current if the manual lists it. When the battery sags to around 10.5 V, current is higher than at 12 V.
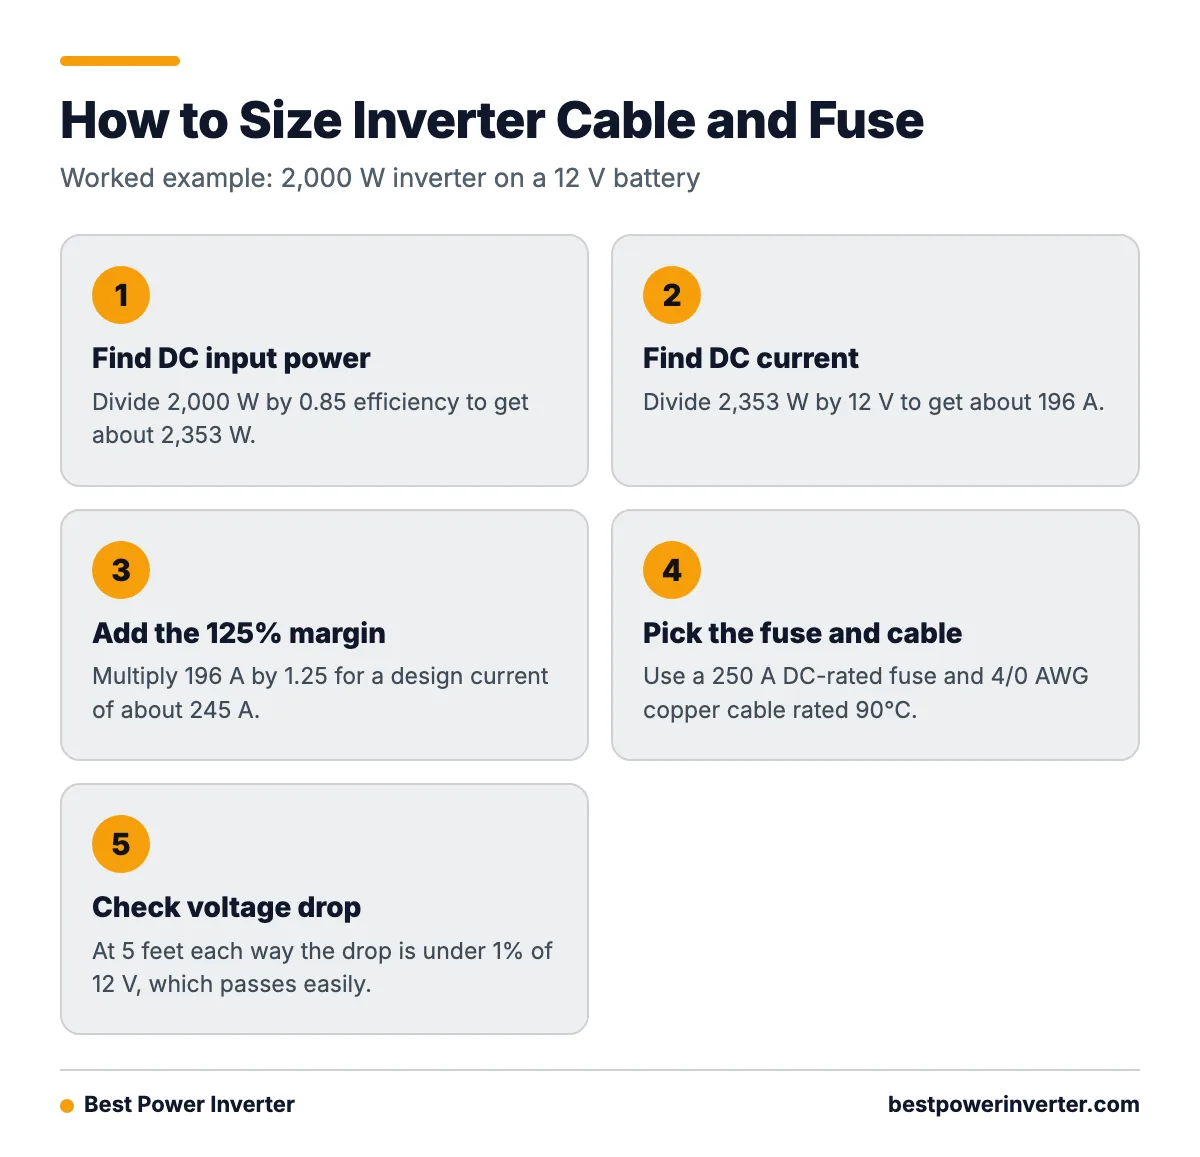
Worked Example: A 2,000 W Inverter on a 12 V Battery
These numbers are an example, not a replacement for your manual.
| Step | Calculation | Result |
|---|---|---|
| DC input power | 2,000 W ÷ 0.85 | about 2,353 W |
| DC current | 2,353 W ÷ 12 V | about 196 A |
| Design current (125%) | 196 A × 1.25 | about 245 A |
| Fuse | Next standard size up to protect the cable | 250 A, DC-rated |
| Cable | 4/0 AWG copper, 90°C rated cable and terminals | about 260 A per NEC Table 310.16 |
Now the voltage drop. Standard copper wire tables list 4/0 AWG at roughly 0.049 ohms per 1,000 feet. Say the battery is 5 feet from the inverter. The round trip is 10 feet, so resistance is about 0.00049 ohms. At 196 A, the drop is about 0.1 V, or under 1% of 12 V. That passes easily.
Now stretch it to 10 feet each way. The drop doubles to about 0.19 V, or 1.6%. That still passes, but you are getting close to the edge. At 20 feet each way it would be about 3.2%, so you would need larger cable or a 24 V system.
Check one more thing: the cable’s ampacity depends on the lowest temperature rating in the chain. If your inverter lugs are rated only 75°C, use the 75°C ampacity column, which is lower than 90°C. Use the inverter maker’s recommended cable size when it is bigger than your calculation.

Where Should the Inverter Fuse or Circuit Breaker Be Installed?
Install it on the positive cable, as close to the battery as practical. A battery can push very high fault current into a short. The fuse protects the cable along its whole run, so every inch of unfused cable is an unprotected inch. One guideline states that battery-side overcurrent protection should sit at the battery end of the circuit to protect the conductor from high available battery fault current.
The same idea shows up in building rules. Salt Lake City’s energy-storage plan review checklist says that when a battery circuit passes through a wall, floor, or ceiling, the required overcurrent protection must be at the energy-storage end.
Do I need a fuse and disconnect between the battery and inverter?
Yes, in most installs you need both. The fuse or breaker protects the wire from a short. The disconnect lets you shut the circuit off for service. Many DC-rated breakers do both jobs. Use parts rated for DC voltage and for the battery’s available short-circuit current. A common Class T fuse is often chosen for lithium banks because of its high interrupt rating.
- If the inverter is more than a few feet from the battery, keep the fuse at the battery and put a disconnect near the inverter.
- If you use lithium batteries, check the fuse’s interrupt rating and the battery maker’s advice.
- If the cable passes through a wall or floor, keep the fuse on the battery side of that pass-through.
How Should the Inverter Be Grounded?
Connect the inverter’s ground lug or chassis terminal to the vehicle chassis or the system grounding point, using the wire size the manual gives. This is the equipment-grounding conductor. It ties exposed metal to ground and is not meant to carry normal operating current. It only carries current during a fault, and that trips a breaker.
Do not mix this up with the DC negative cable or the AC neutral. The DC negative carries full working current. The AC neutral is a grounded circuit conductor that carries load current. The ground wire sits idle until something goes wrong.
- Vehicle or RV: the chassis is the usual ground reference. Follow the inverter manual about the neutral-to-ground bond, as many inverters bond them only when running off the battery.
- Off-grid solar: use one system grounding point, with a ground rod or bus where the code requires it.
- House backup: the grounding and neutral arrangement depends on the transfer switch and panel. Follow its manual and local code.
How Do I Connect an Inverter to a Solar Panel and Charge Controller?
A standard inverter does not connect straight to the panels. The panels feed a charge controller, the controller feeds the battery, and the inverter runs from the battery. The order of connection matters.
PV panels --[PV fuse/disconnect]-- Charge controller --[Fuse]-- Battery
Battery (+) --[Fuse/Breaker]--[Disconnect]-- Inverter (+)
Battery (-) ---------------------------------- Inverter (-)
System ground bonded at one point
- Open all breakers and cover the panels, or work in the dark.
- Connect the battery to the charge controller first. Many controllers read the battery voltage to set up.
- Connect the panels to the controller last.
- Connect the inverter to the battery through its own fuse and disconnect.
Solar and battery circuits may need overcurrent protection whenever the possible current exceeds what the conductor can safely carry. The University of Maryland Extension covers this in Working on Solar Wiring and Fusing. Give each branch its own fuse: panels, controller to battery, and battery to inverter.
Can I Connect an Inverter Directly to a House Electrical Panel?
No. A direct connection with no transfer or interconnection arrangement can send power back onto the utility line. That is called backfeed. It can seriously hurt a line worker who thinks the line is dead, and it can break electrical code.
A safe house backup uses one of these:
- A listed transfer switch that isolates the house from the utility before the inverter powers the circuits.
- A critical loads subpanel fed only by the inverter, with the utility feed separated by a transfer device.
- A listed interconnection built for grid-tied or hybrid inverters, installed and inspected under a permit.
Utility --[Main breaker]--+
                          +--[Transfer switch]-- Critical loads panel
Inverter AC out ----------+
Never use a “suicide cord” with a male plug on both ends. Plugging an inverter into a wall outlet is not a safe connection method.
Cable Routing, Terminals, and Strain Relief
Good routing prevents most of the faults that happen after install day.
- Use proper lugs. Crimp with a hydraulic or heavy-duty crimper, then add adhesive-lined heat shrink. Do not rely on solder alone.
- Torque to spec. Loose lugs make heat. Use the torque value in the manual and a torque wrench.
- Keep the pair together. Run positive and negative side by side along the same path.
- Protect from edges. Use grommets where cable passes through metal, and conduit or loom in exposed areas.
- Add strain relief. Clamp the cable so its weight does not pull on the terminal.
- Stay away from heat and moving parts. Keep cables away from exhausts, hinges, and belts.
- Leave airflow. The inverter needs space for its fan and heat sink.
What Happens If Inverter Cables Are Too Small, Too Long, or Reversed?
| Mistake | What can happen |
|---|---|
| Cable too small | Hot insulation, melted lugs, possible fire, low-voltage shutdowns |
| Cable too long | High voltage drop, so the inverter trips on low battery voltage even when the battery is charged |
| Reversed polarity | Blown internal fuses or a destroyed inverter. Some units have no reverse protection. |
| No fuse near battery | A short on the cable can cause fire with nothing to stop it |
| Loose terminal | Heat, melted plastic, and intermittent power |
| Wrong battery voltage | No start-up, or damage to the inverter |
Quick troubleshooting: if the inverter beeps or shuts down under load, measure voltage at the inverter terminals while it runs. A big difference from battery voltage points to undersized cable or a bad connection. A warm lug points to a loose terminal.

Printable Pre-Energization Checklist
Before any wiring work, de-energize the system. Open the breakers and remove the fuses from all DC and AC sources. Then confirm with a meter that nothing is live.
- ☐ All DC and AC sources are off, with fuses removed.
- ☐ Battery voltage matches the inverter’s DC rating.
- ☐ Positive and negative are labeled and checked twice with a meter.
- ☐ Cable size passes both ampacity (125% rule) and voltage drop checks.
- ☐ Fuse or breaker is on the positive cable, close to the battery, and DC-rated.
- ☐ A disconnect is in place and reachable.
- ☐ Lugs are crimped properly and torqued to the manual’s value.
- ☐ Equipment ground is connected with the specified wire.
- ☐ Cables are protected at edges, clamped, and away from heat.
- ☐ AC output goes to a transfer switch or approved method, never a wall outlet.
- ☐ Fuse installed last, then a small test load first.
Frequently Asked Questions
How to wire inverter?
Turn everything off. Run a fused, correctly sized positive cable and a negative cable from a matching-voltage battery to the inverter. Add a disconnect, ground the chassis, check polarity, then install the fuse last. For house circuits, use a listed transfer switch.
What is the right inverter wire connection for a battery?
Positive goes from the battery through the fuse and disconnect to the inverter’s positive terminal. Negative goes straight from the battery negative to the inverter negative. A separate ground wire goes from the inverter’s ground lug to the chassis or system ground.
What inverter connection wire should I use?
Use fine-strand copper battery or welding cable with insulation rated for the heat and conditions. Size it from your current calculation, add the 125% margin, and check voltage drop. In the 2,000 W, 12 V example, 4/0 AWG fits a short run. Always compare against your inverter manual.
Can I connect an inverter directly to a house electrical panel?
Not without a transfer switch or another code-compliant interconnection. Direct connection risks backfeeding the utility and can injure line workers.
Does the inverter battery voltage have to match the inverter voltage?
Yes. A 12 V inverter needs a 12 V battery bank, and a 24 V inverter needs 24 V.
Do I need a fuse and disconnect between the battery and inverter?
Yes. The fuse protects the cable from shorts and should sit near the battery’s positive terminal. The disconnect lets you isolate the inverter for safe service.
Sources