
Building a 12V to 220V inverter is easy to draw on paper and hard to do safely, because the battery side carries huge current. A DIY inverter uses an oscillator or controller, power MOSFETs, a transformer or high-frequency converter stage, filtering, and protection to turn 12V DC into 220V AC. A 500W load draws about 46A from the battery and a 1000W load about 98A, so cables, fuses, and cooling matter as much as the circuit.
Quick answer
Most beginners should build a 300W to 500W push-pull inverter with a properly rated transformer, a fuse at the battery, and low-voltage cutoff. Treat 1000W as an advanced project, because it pulls close to 100A.
- Best for learning: 300W push-pull, modest current
- Best for sensitive loads: pure sine wave design
- Best for 1000W needs: a certified inverter
- 500W at 90% efficiency draws about 46.3A. 1000W at 85% draws about 98A.
- A 500W build needs a transformer rated around 800VA or higher.
- Fit a 50-60A fuse close to the battery terminal for a 500W build.
- Pure sine wave suits motors and sensitive electronics. Modified sine wave is simpler but causes buzzing and heat in some loads.
- Runtime depends on usable watt-hours and inverter losses, not nominal amp-hours.
- The 220V side can kill. Enclose it, ground it, and test with no load first.
- How do I make a 12V DC to 220V AC inverter?
- What is the simplest 12V to 220V inverter circuit?
- How much battery current does a 500W or 1000W inverter draw?
- What components are needed for a 500W homemade inverter?
- Should I build a modified-sine-wave or pure-sine-wave inverter?
- What fuse, cable size, heatsink, and cooling does a 12V inverter need?
- How long will a 12V battery run a 220V inverter?
- What safety precautions are required with lethal 220V output?
- How do I test the inverter?
- When is buying safer than building?
- What do owners say?
- Frequently Asked Questions
How do I make a 12V DC to 220V AC inverter?
You switch the 12V DC on and off very fast, step the voltage up, and shape the result into AC. Every design does this in the same four stages.
- Oscillator or controller. It makes the switching signal, usually 50Hz for a low-frequency design.
- Power stage. MOSFETs switch the heavy battery current.
- Step-up. A transformer raises 12V to about 220V. High-frequency designs use a small ferrite transformer to make a DC bus near 330V or more, then an H-bridge makes the AC.
- Filtering and protection. Capacitors, inductors, fuses, and sensing circuits clean the output and protect the build.
A 220V RMS wave peaks near 311V. That is why a high-frequency design needs a DC bus above that level.
What is the simplest 12V to 220V inverter circuit?
The simplest circuit is a push-pull inverter. An oscillator IC such as a CD4047 drives two groups of power MOSFETs, and each group pulls current through one half of a center-tapped transformer. The result is a square or modified square wave at 50Hz.
It has few parts and is easy to troubleshoot. It is also unforgiving. If the two MOSFET groups conduct at the same time, current spikes and the parts die fast. Add gate resistors, gate pull-downs, and a clean dead-time arrangement from the start.
Many hobbyists pick MOSFETs like the IRF3205 because they are cheap and have very low on-resistance. Check the datasheet for the exact rating, and do not trust the headline current figure. Real limits come from heat and the heatsink.

How much battery current does a 500W or 1000W inverter draw?
A 500W load draws about 46A, and a 1000W load draws about 98A. The formula is: input current = AC watts ÷ (battery volts × efficiency).
- 500W: 500 ÷ (12 × 0.90) = 46.3A, using a 90% efficiency figure.
- 1000W: 1000 ÷ (12 × 0.85) = 98A, using an 85% efficiency figure.
Modern pure sine wave inverters commonly reach about 88% to 95% efficiency, according to the battery calculator resources listed below, but a homemade build is often lower. Use the lower figure when sizing wires and fuses.
Fuse and cable checks follow from this. Add about 25% to the running current for the fuse, then pick a cable whose ampacity is above the fuse rating. That gives roughly 58A for the 500W case and about 122A for the 1000W case. For a 500W 12V installation, a fuse of about 50-60A placed close to the battery terminal is the common recommendation.
Can a 12V battery really power a 1000W inverter? Yes, but only with a battery that can deliver around 100A without sagging, very short heavy cables, and a short runtime. A small lead-acid battery will sag and trip the low-voltage cutoff quickly. A larger lithium iron phosphate battery handles it better.
What components are needed for a 500W homemade inverter?
Plan for the transformer, MOSFETs, and heatsinks first. They set the cost and the size. The table below shows typical choices. The fuse ranges follow the 125% rule above, and the transformer sizes are practical headroom estimates, not fixed standards.
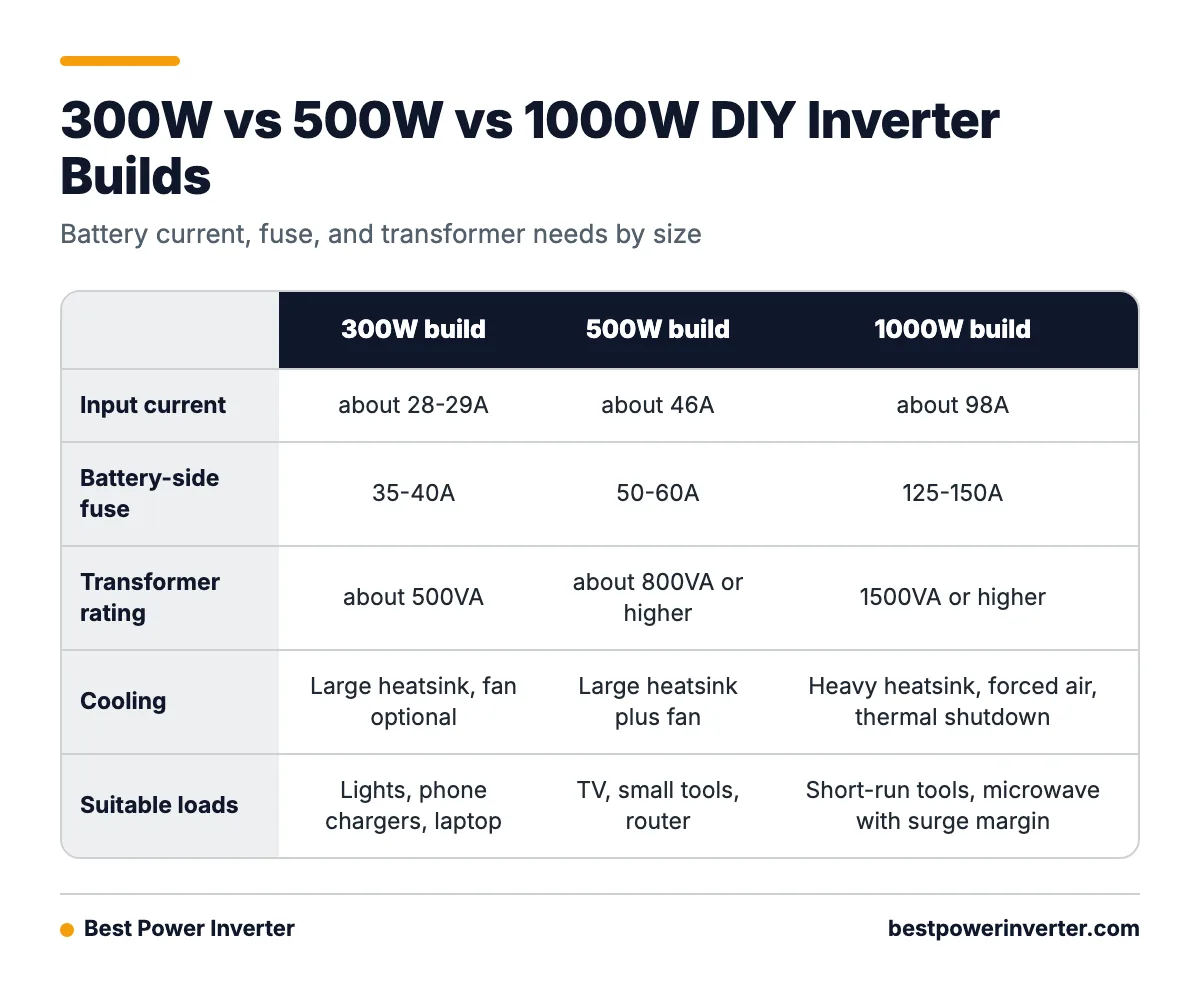
| Item | 300W build | 500W build | 1000W build |
|---|---|---|---|
| Input current (about 85-90% efficiency) | about 28-29A | about 46A | about 98A |
| Battery-side fuse | 35-40A | 50-60A | 125-150A |
| Transformer rating | about 500VA | about 800VA or higher | 1500VA or higher |
| MOSFETs | several per side | more per side, matched | many per side or a larger module |
| Cooling | large heatsink, fan optional | large heatsink plus fan | heavy heatsink, forced air, thermal shutdown |
| Suitable loads | lights, phone chargers, laptop | TV, small tools, router, small fridge with care | short-run tools, microwave only with ample surge margin |
A 500W design may need a transformer rated around 800VA or higher to cover waveform crest factor and practical headroom. Also keep these parts on the list:
- Oscillator or controller IC (CD4047, SG3525, or a microcontroller)
- Gate driver or buffer stage
- Input capacitors with low ESR
- Output filter capacitor rated for 250V AC or more
- Battery-side fuse holder and heavy lugs
- Low-voltage cutoff and temperature sensor
- Insulated enclosure with ventilation
Be careful with peak versus continuous ratings. Many cheap parts and transformers show a surge figure on the label. Size the build for the continuous number, and treat the surge as a bonus that lasts only seconds.
- If you only need lights and chargers, build 300W.
- If you need a TV or small tools, build 500W with a strong heatsink.
- If you need 1000W or motor loads, buy a certified unit.
Should I build a modified-sine-wave or pure-sine-wave inverter?
Build pure sine wave if you will run motors, chargers, audio gear, or anything with sensitive electronics. Choose modified sine wave only for simple loads such as incandescent lights or basic resistive heaters.
Modified sine wave is easier to build. It also causes buzzing, extra heat, and compatibility problems in some chargers, motors, and electronic devices. Motors also need extra startup capacity, often several times their running power, so a 500W inverter may not start a 300W motor.
Pure sine wave builds use SPWM from a microcontroller or a dedicated controller, plus an output filter. They cost more and take more skill. They are quieter and match grid power better. Pure sine wave hardware also tends to have the efficiency range noted above.
What fuse, cable size, heatsink, and cooling does a 12V inverter need?
Put the fuse within a few inches of the battery positive terminal, size the cable above the fuse rating, and give the MOSFETs a heatsink with real airflow.
- Fuse placement: Close to the battery, on the positive lead. A fuse at the inverter end leaves the cable unprotected.
- Cable size: Use thick, short, stranded copper. Check an ampacity chart for your insulation type. Long thin cables heat up and drop voltage, which makes current even higher.
- Heatsink: Mount MOSFETs on insulating pads and use insulating shoulder washers if they share a plate. Measure the plate with a multimeter before power-up to make sure no short exists.
- Cooling: Plan a fan even at moderate loads. Add thermal shutdown with a sensor on the heatsink.
A practical design should include low-voltage cutoff, overcurrent or short-circuit protection, over-temperature shutdown, and input and output filtering. Skip one, and a stalled load or a flat battery can destroy the build.
How long will a 12V battery run a 220V inverter?
Runtime = usable battery watt-hours × inverter efficiency ÷ AC load. Nominal amp-hours alone give an answer that is too high.
Here is a worksheet for a 12V 100Ah battery. The depth-of-discharge figures are common planning assumptions: about 50% for lead-acid and about 80% for lithium iron phosphate.
| Step | Lead-acid | LiFePO4 |
|---|---|---|
| Nominal energy (12V × 100Ah) | 1200Wh | 1200Wh |
| Usable energy | 600Wh (50%) | 960Wh (80%) |
| After 85% inverter efficiency | 510Wh | 816Wh |
| Runtime at 500W | about 1.0 hour | about 1.6 hours |
| Runtime at 1000W | about 0.5 hour | about 0.8 hour |
Real runtime at high current is usually shorter, since lead-acid batteries lose capacity under heavy draw. For a quick check with your own numbers, use the inverter battery calculator. For a deeper discussion of efficiency and sine wave output, see this 12V DC to 220V AC inverter conversion thread.

What safety precautions are required with lethal 220V output?
Treat the output as lethal. Enclose every live part, keep low-voltage and high-voltage wiring apart, and ground the chassis with a clear plan.
- Use an enclosure that no one can touch accidentally, with ventilation holes that keep fingers out.
- Keep creepage and clearance distances between the 220V traces and everything else. Wider is safer.
- Use insulation rated above the working voltage, and keep the transformer isolated from the chassis.
- Use a ground strategy you understand. A floating output and a bonded output behave differently, and mistakes here cause shocks.
- Add strain relief on every cable and a fused output if you can.
Pre-power-up checklist
- Battery polarity checked twice.
- Fuse installed close to the battery positive terminal.
- MOSFET tabs insulated from the heatsink and each other.
- Transformer isolated from the chassis, and windings checked with a meter.
- Output wiring covered, no exposed terminals.
- Enclosure ventilation clear.
- No-load test planned, with a current-limited supply.
How do I test the inverter?
Start with no load and add load in steps. Never connect the battery and a real appliance on the first try.
- Power from a current-limited bench supply, or put a car-bulb in series with the battery lead.
- Check gate signals with an oscilloscope before connecting the transformer, if you have one.
- Measure the no-load input current. A very high number points to a shoot-through fault.
- Measure output voltage with a meter rated for it. Keep one hand behind your back.
- Add a 50W bulb, then 100W, then more. Check temperature after each step.
- Run at the target load for a set time and feel for hot cables and lugs with the power off.
When is buying safer than building?
Buy a certified inverter if the output will power anything expensive, anything in a home, or anything near people who do not know the risks. Also buy for loads near 1000W or above. Certified units include tested protections, and a homemade one cannot prove them without lab gear.
Build when the goal is learning, repair, or a custom small load.
What do owners say?
Owners like
- Low-voltage battery input makes these inverters useful in vehicles, RVs, boats, and small off-grid systems.
- DIY construction allows part replacement and customization for a specific load.
- Pure-sine-wave designs are praised for quieter operation and better compatibility with sensitive electronics.
Common complaints
- Actual continuous output is often lower than the advertised peak wattage.
- High battery current causes hot cables, voltage sag, blown fuses, or MOSFET failure when wiring and cooling are undersized.
- Modified-sine-wave output can cause buzzing, excess heat, or incompatibility with some chargers, motors, and electronic devices.
- Cooling fans may be noisy and can become necessary even at moderate loads.
- Transformer and MOSFET heating can become severe during startup surges or sustained loads near the claimed rating.
Summarised from owner reviews and long-term user reports; individual experiences vary.
Frequently Asked Questions
How to make inverter 12v 220v?
Use an oscillator to drive power MOSFETs, feed a center-tapped transformer, then add filtering and protection. Start with a 300W push-pull design, fuse the battery lead, and test with no load before adding any appliance.
Can I build a homemade inverter 12v to 220v 500w?
Yes, but plan for about 46A of battery current at 90% efficiency, a transformer around 800VA or higher, a 50-60A fuse close to the battery, and a strong heatsink with a fan. Weak wiring is the most common cause of failure.
What is the simplest 12v to 220v inverter circuit?
A push-pull circuit with a CD4047 oscillator, a group of MOSFETs per side, and a center-tapped transformer. It produces a square or modified wave, which suits lights and simple loads but not all electronics.
How do I make a 12v dc to 220v ac inverter that is pure sine wave?
Use an SPWM controller or microcontroller with an H-bridge, either on a large low-frequency transformer or on a high-frequency DC bus of about 330V or more, then add an output filter. It is harder than modified sine wave and needs careful testing.
What size transformer does a 12v to 220v inverter circuit need?
Size it above the continuous load. For 500W, around 800VA or higher gives headroom for waveform crest factor. For 1000W, plan on 1500VA or more.
How much current does a 12v inverter to 220v pull at 1000W?
About 98A at 85% efficiency. That needs a fuse near 125-150A, very thick short cables, and a battery that can deliver the current without sagging.
Is a diy 12v to 220v inverter safe to use at home?
It can be if it is fully enclosed, properly fused, grounded with a clear plan, and tested in steps. For household loads or valuable equipment, a certified inverter is the safer choice.
Sources