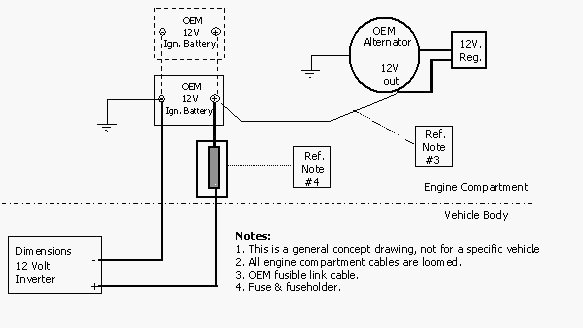
To hook up a power inverter, connect its positive lead to the positive battery terminal and the negative lead to the ground. Ensure the inverter is off before making connections to avoid electrical hazards.
A power inverter is a versatile device, transforming DC power from a battery into AC power for electronic devices. Whether you’re on a camping trip or in need of emergency power during an outage, a power inverter can be a critical tool.
It is crucial, though, to understand the proper setup to ensure safety and functionality. Users should select an inverter that matches the voltage of the battery and can handle the power requirements of the devices they plan to run. Always use the correct gauge of wiring, fuses, and connectors.
Effective installation not only guarantees the longevity of the power inverter but also the safety of its users. Before beginning the installation, reading the manufacturer’s instructions and wearing appropriate safety gear are essential steps to success.
Introduction To Power Inverters
Power inverters transform DC power to AC power, powering devices on the go. They are crucial for off-grid electrical systems and emergency power backup. One can use inverters to run laptops, small appliances, and even medical equipment in cars, boats, or RVs.
Modified sine wave and pure sine wave are the two main types. Modified sine wave inverters are less expensive but may not support all devices. Pure sine wave inverters work with almost everything but cost more.
Selecting the right size is key. It depends on the power requirements of your gadgets. To calculate total watts, add up the wattage of each device you plan to use. Always choose an inverter with a slightly higher wattage than your total needs to ensure reliability and prevent overload.
:max_bytes(150000):strip_icc()/5582668640_798a8349e0_b-andy-arthur-5806a2f63df78cbc2843feea.jpg)
Credit: www.lifewire.com
Preparation For Installation
Before starting the installation of your power inverter, gathering the right tools and materials is crucial. Ensure you have a screwdriver, drill, wrench set, wire cutters, and pliers. Don’t forget high-quality electrical cables, connectors, and a fuse. A well-charged battery is necessary for testing. Always prioritize safety before handling any equipment.
Wear protective gear such as gloves and safety glasses. Double-check that the power source is off to avoid electric shocks. Read the user manual carefully to familiarize yourself with your power inverter.
Choosing the right location is essential for optimal performance. This spot should be dry, cool, and ventilated. Keep it away from heat sources and potential sparks. Ensure the inverter is easily accessible for maintenance and monitoring.
| You May Like: Where Do You Put a Power Inverter in A Truck
Step-by-step Installation Process
Discover the essentials of connecting a power inverter to your system with our straightforward guide. Our step-by-step installation process breaks down the intricacies of setting up your power inverter, ensuring a hassle-free experience and a reliable power source for your devices.
- Ensure the power inverter is off before starting the installation.
- Identify the positive and negative terminals on both battery and inverter.
- Attach the positive cable to the positive terminal of the battery.
- Secure the negative cable to the battery’s negative terminal.
- Double-check connections to ensure they are tight and correct.
- Ground the inverter by connecting it to the vehicle’s chassis.
- Use proper grounding to prevent electrical shocks and damage.
- Connect the inverter to appliances using the correct wiring.
- Ensure all cables and wires are properly insulated and routed.
- Switch on the inverter to test its function with the appliances.
- Observe the operation and check for any error messages or issues.
Troubleshooting Common Issues
Resolving power output problems can often begin with checking connections. Ensure all cables and terminals are secure. Look for any signs of damage or corrosion that may hinder performance. Sometimes, the solution is as simple as resetting the inverter or replacing a faulty fuse.
Overheating issues often stem from inadequate ventilation. To combat this, confirm that the inverter is in a well-ventilated area. Make sure there’s enough clearance around the cooling fan and heat sinks. Regularly remove any accumulated dust or debris that can block air flow.
For maintaining your power inverter, regular checks are key. Clean the inverter’s exterior with a dry cloth. Inspect the battery terminals and apply anti-corrosion paste if needed. Ensure the inverter is not overly exposed to moisture or extreme temperatures to enhance its longevity and performance.
| You May Like: What Will a 100 Watt Power Inverter Run?
Advanced Topics And Considerations
Integrating power inverters with renewable energy systems necessitates a clear grasp of energy flows. Many systems harvest energy from the sun or wind. Such systems store this energy in batteries. A power inverter converts this stored energy into usable electricity for homes.
Understanding and managing power draw is vital to avoid system overload. Every device linked to an inverter pulls a specific amount of power. Summing up these amounts shows the total power draw on the inverter. It is essential to track this to ensure the inverter can handle the load and avoid tripping.
Installation of power inverters involves legal and warranty considerations. Always adhere to local electrical codes and standards. Proper installation ensures that the manufacturer’s warranty remains valid. Consult with a professional to ensure compliance and safety.

Credit: www.magnum-dimensions.com
Conclusion
Wrapping up, hooking up a power inverter is simpler than it might seem. Follow the steps outlined with care, and your devices will hum to life off-grid. Remember, safety first – always double-check connections. Power up and enjoy the energy independence you’ve just unlocked!