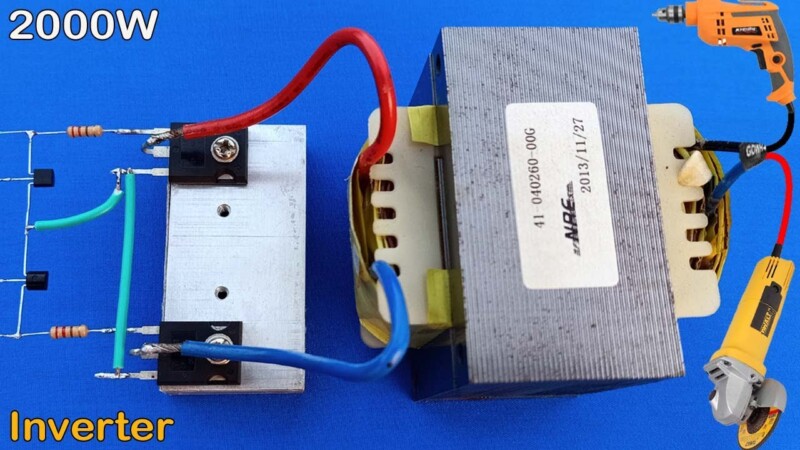
To make a power inverter, gather an oscillating circuit, a transformer, and a switching element. Establish connectivity between them to convert DC to AC power.
Creating a power inverter involves converting direct current (DC) from a battery or solar panel into alternating current (AC), the form of electricity that powers most household appliances.
This DIY project requires some electronics knowledge, particularly in understanding circuits and handling various components such as transistors, resistors, and capacitors.
A power inverter’s core function is to enable the use of everyday devices when only DC power sources are available, like during a camping trip or in a remote area without grid power. Cable selection and circuit design are critical to ensure the inverter’s efficiency and safety.
This conversion task not only enlightens enthusiasts about electrical engineering basics but also equips them with the aptitude to craft a handy and portable energy solution. By adhering to precise guidelines, one can construct a functional power inverter that serves immediate electricity conversion needs.
Introduction To Power Inverters
Power inverters change DC (direct current) to AC (alternating current). They let devices run when away from power outlets. Essential for portable electricity, they work in cars, boats, and RVs. People use them during power outages too. Their use spans from charging laptops to powering tools on construction sites.
With these inverters, campers enjoy comforts of home in the wild. They are key for medical equipment during emergencies. Inverters are also used in renewable energy systems. They help turn sunlight into usable power in homes.

Credit: powmr.com
Essential Components And Tools
Building a power inverter requires specific materials and tools. These are vital to ensure a safe and effective build. Gather electronic components such as transformers, transistors, resistors, and diodes. Wiring and connectors are also necessary for electrical connections.
Regarding tools, a soldering iron and wire strippers are essential for joining components. A multimeter helps in checking voltages and connections. Using proper tools ensures precision and prevents damage to delicate parts.
Safety gear is non-negotiable. Always use insulated gloves and protective eyewear. Working in a well-ventilated area is important to avoid fume inhalation. Keep a fire extinguisher nearby as a precaution. Remember, safety first when working with electronics.
| You May Like: How Does the Power Inverter Prevent Overcharging?
Designing A Simple Power Inverter
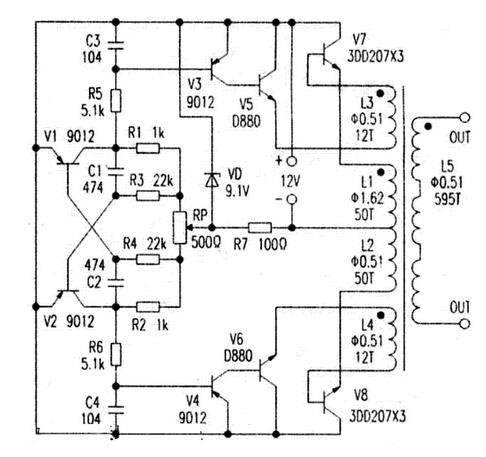
Designing a simple power inverter involves several important steps. Get all the required components first. Check the circuit diagram to understand connections. The transformer, transistors, resistors, and capacitors must be ready. Ensure tools, like a soldering iron, are at hand.
For the circuit diagram, identify where to connect input and output wires. Notice the polarity for diodes and electrolytic capacitors. Follow the diagram closely to avoid errors. Put each component in its place on the PCB.
Soldering and assembly require care. Start with smaller components like resistors. Solder each part and double-check connections. Keep the soldering iron tip clean for the best results. Work in a well-ventilated area. Take your time and do not rush the soldering process. A neat assembly leads to a functional inverter.
Testing And Troubleshooting
Power inverter setup requires careful handling. Start by checking the battery connections. Make sure they are tight and clean. Test the voltage using a multimeter. Expect a readout close to the battery’s rated voltage. Proceed with caution when turning on the inverter.
Incorrect wiring or low battery voltage often cause issues. Overheating might suggest a faulty fan or overload. If the inverter fails to power devices, verify the output wattage and compatible device ratings.
For fine-tuning, monitor the inverter’s performance. Regularly check the input and output to ensure stability. A consistent voltage range maintains efficient operation. Seek professional help for internal issues. Remember, safety comes first!
| You May Like: How Do I Ensure the Bestek Inverter is Not Overloaded?
Advanced Considerations
Upgrading your power inverter could lead to better performance and durability. To begin with, enhance the inverter’s components, like capacitors and transformers. This can reduce energy loss and increase longevity. Also, consider adding a more robust cooling system to prevent overheating.
For efficiency and power output optimization, it is important to select an inverter with a higher efficiency rating. Look for ones that promise minimal no-load power consumption and maximized energy conversion. It’s wise to regularly maintain your system to ensure peak performance.
Integrating renewable energy sources such as solar panels or wind turbines with your inverter can provide a consistent power supply. Make sure your inverter is compatible with these energy sources. A charge controller or hybrid inverter might be necessary for this setup.

Legal And Environmental Considerations
Building a power inverter requires a keen understanding of legal protocols. Manufacturers and DIY enthusiasts should both ensure their designs meet all regulatory standards. This means adhering to local and international electricity and safety regulations.
Considering the environmental impact is essential for sustainability. Select components that are eco-friendly and aim for energy efficiency in design. Key aspects of sustainability include minimizing waste and optimizing resource use.
End-of-life disposal and recycling are critical. Users and makers should know the proper ways to dispose of electronic components. Many components can be recycled or safely disposed of, to reduce environmental harm.
Credit: www.inverter.com
Conclusion
Building your own power inverter can be a gratifying project. It allows for personal customization and understanding of electronic principles. Remember, safety is paramount when dealing with electricity.
With the right tools and guidance, you’ve learned that anyone can create a functional and reliable power inverter.
Embrace the challenge, and enjoy the empowerment of DIY electronics!