If you want to power your devices safely and efficiently using a power inverter, knowing how to wire and connect it correctly is key. But wiring a power inverter can feel tricky if you’re not sure where to start.
What if you make a mistake that could damage your equipment or even cause a safety hazard? Don’t worry — in this guide, you’ll learn simple, step-by-step instructions to connect your power inverter like a pro.
By the end, you’ll gain the confidence to set up your inverter properly and get the most out of your power system.
Ready to make your inverter work smoothly and safely? Let’s dive in!
Choosing The Right Inverter
Choosing the right power inverter is key for a safe and efficient setup. The right inverter matches your power needs and ensures smooth operation. This step helps avoid damage and keeps your devices running well. Learn about inverter types, power matching, and safety ratings below.
Types Of Power Inverters
Power inverters come in three main types: modified sine wave, pure sine wave, and square wave. Modified sine wave inverters are common and cost-effective. Pure sine wave inverters produce cleaner power, ideal for sensitive electronics. Square wave inverters are rare and less efficient. Choose based on your device needs and budget.
Matching Inverter To Power Needs
Calculate the total wattage of your devices before selecting an inverter. Your inverter should handle peak and running power without strain. Add a safety margin of 20-30% to your total power needs. This ensures the inverter works well under load and extends its life.
Safety Ratings And Certifications
Check for safety certifications like UL, CE, or ETL on the inverter. These marks show the product meets safety standards. Look for built-in protections such as overload, short circuit, and thermal shutdown. A certified inverter reduces risk and increases reliability in your power system.
Gathering Necessary Tools And Materials
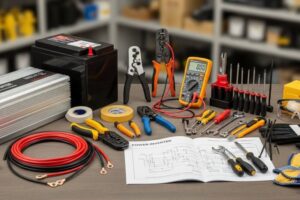
Before wiring and connecting a power inverter, gathering all necessary tools and materials is essential. Proper preparation ensures safety and smooth installation. This step helps avoid interruptions and mistakes during the process. Below are the key items you need to collect before starting your wiring project.
Wires And Connectors
Choose wires with the right gauge for your inverter’s power rating. Thicker wires reduce voltage drop and increase safety. Use copper wires for better conductivity and durability. Ensure connectors fit securely on terminals to prevent loose connections. Ring terminals and butt connectors are common choices for inverter wiring.
Fuses And Circuit Breakers
Fuses protect your inverter and battery from electrical faults. Select a fuse rated slightly above your inverter’s maximum current. Circuit breakers offer resettable protection and are easier to manage. Place fuses or breakers close to the battery to protect the entire wiring run. This setup prevents damage from short circuits or overloads.
Mounting Hardware
Secure your inverter with mounting brackets or screws to avoid movement. Use insulated mounts to reduce vibration and electrical shorts. Choose a dry, ventilated location to keep your inverter cool. Proper mounting extends the inverter’s life and maintains safety during operation.
Read More: What Will a 300 Watt Power Inverter Run?
Selecting A Location For Installation
Selecting the right location to install your power inverter is crucial for its performance and safety. The spot you choose affects how well the inverter works and how long it lasts. Pay close attention to ventilation, space, and power source proximity. These factors help prevent problems and keep your inverter running smoothly.
Ventilation And Heat Considerations
Power inverters produce heat while running. Proper airflow prevents overheating. Avoid tight, closed spaces. Install the inverter where air can circulate freely. Keep it away from direct sunlight and heat sources. Good ventilation ensures the inverter stays cool and works efficiently.
Accessibility And Space Requirements
Choose a place that is easy to reach. You will need to check and maintain the inverter regularly. Leave enough space around it for wiring and future upgrades. Avoid cramped areas that make installation or repairs difficult. Accessibility saves time and reduces frustration.
Proximity To Power Sources
Place the inverter near batteries or power sources. Shorter cables reduce power loss and improve efficiency. Avoid long wire runs that increase resistance. Make sure the location allows safe wiring without crossing walkways or sharp edges. Proper placement simplifies connections and enhances safety.
Preparing The Power Source
Preparing the power source is the first and most critical step in wiring a power inverter. A stable and well-set power source ensures the inverter works efficiently and safely.
Proper preparation involves choosing the right battery, confirming it meets voltage and capacity needs, and protecting the battery terminals from damage or short circuits. These steps help avoid electrical issues and extend the life of your inverter system.
Battery Selection And Setup
Choose a deep-cycle battery designed for inverter use. These batteries provide steady power over long periods.
Avoid using standard car batteries, as they are not ideal for continuous discharge. Place the battery in a dry, ventilated area to prevent overheating. Secure the battery firmly to avoid movement during operation. Proper setup keeps the system safe and reliable.
Ensuring Proper Voltage And Capacity
Match the battery voltage with the inverter’s requirements, usually 12V, 24V, or 48V. Check the inverter’s manual for exact voltage details. Select a battery with enough amp-hour (Ah) capacity for your power needs.
Higher capacity means longer run time. Use multiple batteries in series or parallel if necessary to meet voltage and capacity demands. Correct voltage and capacity prevent inverter damage and power failures.
Battery Terminal Protection
Cover battery terminals with protective caps to prevent accidental shorts. Use insulated connectors and secure all cable connections tightly. Install a fuse or circuit breaker close to the battery’s positive terminal.
This protects against electrical faults and overloads. Regularly inspect terminals for corrosion or loose connections. Proper terminal protection ensures safe operation and reduces fire risk.
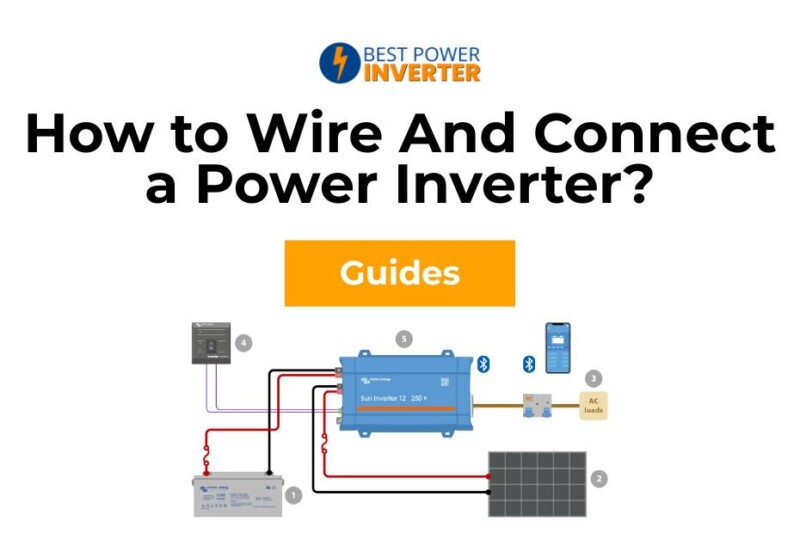
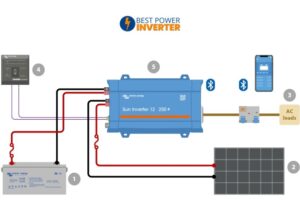
Wiring The Inverter To The Battery
Wiring the inverter to the battery is a crucial step for a reliable power setup. Proper wiring ensures the inverter works safely and efficiently. It also protects your equipment from damage. Follow the right procedures to avoid any electrical hazards. Each connection must be secure and correctly sized to handle the current load.
Choosing The Correct Cable Size
Select cables that match the inverter’s power rating. Use thicker cables for higher power inverters. Thin cables can overheat and cause voltage drops. Check the inverter manual for recommended cable size. Measure the cable length from battery to inverter. Longer cables need larger sizes to prevent power loss. Copper cables are best for conductivity and durability.
Connecting Positive And Negative Terminals
Connect the positive terminal of the battery to the inverter’s positive input. Use a clean and tight connection to avoid resistance. Repeat the process for the negative terminal. Attach the cable securely to the battery post or terminal bolt. Avoid touching both terminals at the same time. Confirm polarity before tightening the connections. Incorrect polarity can damage the inverter and battery.
Installing Fuses And Circuit Breakers
Install a fuse or circuit breaker close to the battery’s positive terminal. This protects the wiring and equipment from short circuits. Choose a fuse rated slightly above the inverter’s maximum current. Position the fuse holder for easy access. Circuit breakers allow quick reset after a fault. They provide added safety for your power system. Never skip this step to ensure safe operation.
Connecting The Inverter To The Electrical System
Connecting the inverter to the electrical system is a key step for powering your devices. Proper wiring ensures safety and efficiency. It also helps your inverter work smoothly with existing circuits. Follow clear methods to link the inverter to your home or vehicle system.
Ac Output Wiring Options
The inverter’s AC output can connect in several ways. You may use a dedicated outlet for specific devices. Another option is hardwiring the inverter directly to your electrical panel. This allows power to flow to multiple circuits. Use proper gauge wires to handle the inverter’s load. Always include a circuit breaker for safety. This setup prevents overloads and short circuits.
Using Transfer Switches
A transfer switch safely switches power between the inverter and the main grid. It stops backfeeding power into the utility lines. This is important during outages or generator use. Transfer switches come in manual or automatic types. Install them near your electrical panel for easy access. The switch ensures only one power source runs your circuits at a time. This protects utility workers and your equipment.
Integrating With Home Or Vehicle Systems
Integrate the inverter with your home or vehicle’s electrical system carefully. In homes, connect the inverter to critical circuits like lighting or appliances. Label these circuits for clarity. In vehicles, connect the inverter to the battery with heavy-duty cables. Use a fuse close to the battery to protect the wiring. Keep cables short to reduce voltage drops. Secure all connections tight to avoid loose contacts and sparks.
Testing The Inverter Setup
Testing the inverter setup ensures safe and reliable power conversion. This step confirms the wiring and components work as intended. Proper testing prevents damage to connected devices and maintains system efficiency.
Verifying Connections
Start by inspecting all wiring points. Check if cables are tight and secure. Look for any loose or exposed wires. Confirm the polarity matches the inverter’s requirements. Use a multimeter to test continuity. Ensure the fuse or circuit breaker is in place and functioning.
Checking Output Voltage And Frequency
Power on the inverter without any load. Use a voltmeter to measure output voltage. It should match the inverter’s rated voltage, usually 110V or 220V. Next, check the frequency with a frequency meter. Standard frequency is 50Hz or 60Hz depending on your location. Accurate voltage and frequency ensure device compatibility.
Load Testing Procedures
Connect a small, known load to the inverter output. Turn on the load and observe the inverter’s response. Check for stable voltage and frequency under load. Monitor the inverter for any unusual noises or heat. Gradually increase the load to the inverter’s capacity. Stop if the inverter shows signs of strain or instability.
Read More: What Will a 1000 Watt Power Inverter Run?
Maintaining And Troubleshooting
Maintaining and troubleshooting a power inverter is essential for safe and efficient operation. Regular care helps avoid unexpected failures and keeps the inverter working at its best.
Simple checks and quick fixes can save time and money. Understanding common problems and their solutions ensures you stay prepared. Following good maintenance habits extends the life of your inverter and protects your investment.
Regular Inspection Tips
Check all wiring connections for tightness and corrosion. Loose or corroded connections cause poor performance or damage. Look for any signs of wear or fraying on cables. Clean dust and debris from vents and fans to prevent overheating.
Test the inverter’s output voltage regularly to confirm stable power. Make sure the inverter is mounted securely in a dry, ventilated area. Replace damaged parts immediately to avoid bigger problems.
Common Issues And Fixes
Inverter not powering on often means a blown fuse or bad connection. Inspect and replace fuses as needed. Overheating can cause the inverter to shut down; check cooling fans and vents. If the inverter trips frequently, reduce the connected load or check for short circuits.
Audible alarms often indicate voltage or temperature issues; consult the manual for error codes. Weak or no output may require battery inspection or replacing old cables. Always disconnect power before troubleshooting to stay safe.
Extending Inverter Lifespan
Use the inverter within its rated capacity to avoid overload. Keep the inverter cool by ensuring proper airflow around it. Avoid exposing the inverter to moisture or extreme temperatures. Schedule regular professional inspections for thorough maintenance. Store the inverter in a clean, dry place when not in use.
Use high-quality cables and connectors to prevent electrical faults. Following these steps helps your inverter last longer and work reliably.
Conclusion
Wiring and connecting a power inverter is simple if you follow steps carefully. Always use the right cables and secure all connections tightly. Keep safety in mind and avoid shortcuts. Double-check your work before powering the inverter on. This helps prevent damage and ensures smooth operation.
With proper setup, your inverter will provide reliable power when needed. Practice patience and take your time during installation. You can confidently handle your power needs with the correct wiring approach.