

Match the inverter’s continuous and surge ratings to the tool’s running and startup watts, then wire it straight to the battery with short, fused, heavy cables. This guide covers drills, saws, grinders and compressors: how much each pulls, which cable and fuse to use, how long a battery lasts, and when to switch to something else.
Quick answer
Size the inverter to the tool’s startup surge, not just its running watts. Wire anything above about 150 W directly to the battery with a fuse near the positive terminal, and keep the engine running. Stop if the inverter alarms or voltage falls toward 12 V.
- Best for drills and jigsaws: 1000 W pure sine wave, direct to battery
- Best for saws and grinders: 2000 W or larger pure sine wave
- Best for compressors and all-day use: generator or power station
Can a car inverter run a drill, circular saw, grinder or other power tool?
Yes, within limits. Using a car inverter for power tools means converting your vehicle’s 12 V DC battery power into 120 V AC, the same kind that comes from a wall outlet. Drills, jigsaws and sanders are easy to support. Circular saws, grinders and shop vacuums need a large inverter and heavy cabling. Small air compressors and table saws are usually better served by a generator.
The setup suits contractors, handymen, van lifers and DIYers working far from outlets, such as someone finishing a deck or fence on a remote site with no practical way to run a long cord. Treat the inverter’s AC output like household mains: manufacturers warn it carries the same shock risk, and the unit must never be connected to a home’s AC wiring. The Ring Automotive modified sine wave inverter manual is one example of the kind of safety guidance makers publish.
How a car power inverter works
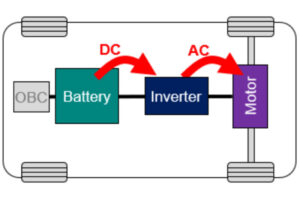
An inverter sits between the battery and the tool. The vehicle stores energy as 12 V DC, while corded tools in North America expect 120 V AC. Four parts matter in the chain:
| Component | Function | Notes |
|---|---|---|
| Car battery (DC) | Supplies the main energy | Should be healthy and fully charged |
| Power inverter | Converts DC to AC | Rated by wattage and waveform |
| Power tool | Consumes AC electricity | May need surge wattage when starting |
| Vehicle alternator | Recharges the battery while running | Supports the inverter during longer use, within its output limit |
Should I use a pure sine wave or modified sine wave inverter for power tools?
Choose pure sine wave for any tool with a motor or speed control. Modified sine wave is cheaper and acceptable for simple resistive loads, but it can make motor tools run hotter and noisier, and some variable-speed tools will not run properly on it.
- Modified sine wave: fine for small electronics and simple loads. Owners report noise, heat or poor performance with some chargers and electronics.
- Pure sine wave: costs more, but delivers clean power that matches household AC. It suits grinders, circular saws and variable-speed drills, with less heat, less buzzing and fewer unexplained shutdowns.
Modified sine wave units are generally less efficient with inductive loads, because part of the waveform does no useful work in a motor.
How many watts does my power tool need at startup and while running?
Check the nameplate on the tool. Running watts are what it draws while cutting or drilling at a steady pace. Startup surge is the brief spike when the motor spins up from rest, and it commonly reaches 2 to 3 times the running figure for motor loads. Guides that quote only one number miss the reason inverters trip.
The figures below are representative ranges based on manufacturer nameplate ratings, so always check the label on your own tool. The DC amp column is a calculation (watts divided by 12 V, divided by 0.85 for assumed inverter efficiency), not a measurement.
| Power tool | Running watts | Startup surge (W) | Minimum inverter | Approx. DC amps at 12 V |
|---|---|---|---|---|
| Jigsaw | 400 | 600 | 800 W | about 39 A |
| Corded drill | 600 | 900 | 1000 W | about 59 A |
| Angle grinder | 900 | 1800 | 2000 W | about 88 A |
| Shop vacuum | 1000 | 2000 | 2500 W | about 98 A |
| Circular saw | 1200 | 2400 | 2500 W | about 118 A |
| Small air compressor | 1500 | 3000 | 3500 W | about 147 A |
These surge figures explain why a “1000 W inverter“ sometimes cannot start a 900 W drill: the spike can exceed the inverter’s peak rating even when the running load fits. Check the continuous rating and the peak rating separately, because they are two different numbers on the spec sheet.
What inverter size should I choose for a power tool?
Pick a continuous rating at least 20% above the tool’s running watts (so the load stays below about 80%) and a peak rating above its startup surge. If you are unsure, round up.
| Tool power rating | Minimum inverter size | Recommended type |
|---|---|---|
| Up to 800 W | 1000 W inverter | Modified sine wave may work for basic drills and lights, but pure sine wave is safer for any motor tool |
| 800 to 1500 W | 2000 W inverter | Pure sine wave (saws, grinders) |
| 1500 to 3000 W | 3000 to 5000 W inverter | Pure sine wave, heavy-duty only |
Worked example: a circular saw with a 1200 W running load
- Surge: 1200 W x 2 to 3 = 2400 to 3600 W, so look for a peak rating of at least 3000 W, preferably more.
- Continuous rating: 2000 W covers the 1200 W load with headroom, keeping the inverter below about 80% of its rating.
- Battery current: 1200 W divided by 12 V is 100 A before losses. With roughly 85% efficiency it is about 118 A while cutting, with a bigger spike at startup.
- Cable and fuse: that current calls for 4 AWG or heavier cable over a short run and a fuse in the 150 to 200 A range.
A 100 A draw is why direct battery cables and proper fusing are required, not optional extras.
Can I plug a high-wattage tool into the vehicle’s 12-volt accessory socket?
For most power tools, no. Lighter and accessory sockets are typically protected by a 10 to 15 amp fuse, which limits them to roughly 120 to 180 W at 12 V. A 600 W drill pulls around 50 A from the battery, and a 1200 W saw pulls more than 100 A, so the socket fuse blows or the thin wiring behind it overheats long before the tool runs properly. Consumer guidance for serious loads is to connect the inverter directly to the battery or its remote terminals rather than the lighter adapter.
The socket is fine for small plug-in inverters running phone chargers, laptops or LED lights. Anything with a motor should go on battery cables with an inline fuse.
Which power source should I use: socket, battery, power station, generator or cordless?
| Situation | Best option | Why |
|---|---|---|
| Chargers, LED lights, laptop | Accessory socket inverter | Loads stay within the 10 to 15 A socket fuse |
| Drill, jigsaw, sander, occasional saw cuts | Direct-to-battery inverter, engine running | Handles 40 to 120 A with correct cable and fuse |
| Quiet, short, light jobs with no engine | Portable power station | Built-in protection, no vehicle wiring to do |
| Compressor, table saw, hours of work | Generator | Surge and sustained load exceed what a 12 V system sensibly supports |
| One tool, no cord needed | Cordless tool battery | No inverter losses, no wiring risk |
Why does my vehicle setup matter?
A well-built inverter still fails if the battery and wiring cannot support it. Weak batteries drop voltage and trigger low-voltage alarms, and undersized cables overheat.
- Battery capacity: a typical car battery (about 60 Ah) can run a small drill for roughly 30 minutes before voltage dips too low, because only about half of a starting battery’s capacity should be used. For heavy tools, use a deep-cycle or auxiliary battery.
- Alternator output: the alternator recharges the battery as the engine runs. If you pull more than it can supply, the battery drains anyway. Output at idle is lower than at higher revs.
- Cable gauge: thicker cable means less resistance. Undersized cables create heat and voltage drop. A common guideline is 4 AWG or thicker for 2000 W-plus inverters.
- Ventilation and mounting: inverters generate heat near their limit. Mount in a cool, ventilated area, as close to the battery as practical, never in a sealed compartment or under a seat where clutter can block the fans.
| Vehicle component | Ideal setup for tool use |
|---|---|
| Battery | Deep-cycle or dual setup |
| Alternator | 100 A or higher output for loads above about 1000 W |
| Cables | 4 AWG minimum for 2000 W and above, heavier for longer runs |
| Fuse | Inline fuse near the battery positive terminal, sized to the inverter and cable |
| Engine | Keep running for continuous use |
Electrical load also becomes engine load. One horsepower equals about 746 W, so a 1000 W load needs a little over 1 HP of engine output once alternator and inverter losses are counted.
Can the engine run while the inverter powers a tool?
Yes, and for anything above light loads it should. With the engine running, system voltage usually sits around 13.8 to 14.4 V, which keeps the inverter efficient and away from its low-voltage alarm. On battery alone, a heavy tool can drain a standard car battery in minutes.
The alternator replaces what the tool takes only up to its own output. If a tool pulls more than the alternator can deliver at idle, voltage still falls, so raise the revs slightly or stop. Never run the engine in a closed garage, because exhaust carbon monoxide is deadly.
How should I connect a high-power inverter directly to the car battery?
Use short, heavy cables with a fuse or circuit breaker close to the positive terminal. High-power inverter manufacturers specify exactly this, and the ATD 1500 watt inverter manual is a typical example. If you are unfamiliar with high-current 12 V wiring, manufacturers recommend professional installation.
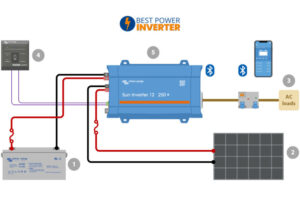
Many inverter failures trace back to poor connections or wrong wire sizes rather than the inverter itself. Gather the inverter, correctly sized cables, an inline fuse, ring terminals and the tool.
Step 1: Mount the inverter safely
- Avoid hot spots like the engine bay, and keep it away from flammable materials.
- Keep it ventilated, with clear space around the cooling fans.
- Mount it flat and firm to avoid vibration damage.
- Stay close to the battery (within 3 to 4 feet ideally) to reduce voltage drop and heat.
- Keep it dry. Manufacturer manuals, such as this Northern Tool inverter manual, say to avoid use in wet conditions.
In a van or truck, a cargo area or the space under a rear seat works if it has airflow and the inverter sits near the battery. Short cables, cool air, firm mount.
Step 2: Connect the wires
This is the part people rush, and it carries the highest fire risk. You need a red positive cable, a black negative cable of equal thickness, an inline fuse holder within 12 inches of the battery positive terminal, and ring terminals for tight connections.
- Make sure the inverter is switched off and the fuse is out of its holder.
- Connect the red cable to the inverter’s positive terminal.
- Run the other end through the inline fuse holder to the battery’s positive post, but do not tighten yet.
- Connect the black cable from the inverter’s negative terminal to the battery’s negative post, or a solid chassis ground point recommended in the inverter’s manual.
- Tighten all terminals, snug but not overtight.
- Insert the fuse last, then switch the inverter on.
Double-check polarity before turning it on. Reverse polarity can damage an inverter in seconds, and loose or undersized cables can overheat. When finished, switch the inverter off before disconnecting it from the battery.
What fuse, cable size and cable length are appropriate?
Match both to the inverter’s rating, and keep the run short. Treat this table as a starting point and follow your inverter manual if it specifies a larger cable or fuse.
| Inverter power | Recommended cable gauge | Fuse size |
|---|---|---|
| 500 to 1000 W | 6 AWG | 80 to 125 A |
| 1000 to 2000 W | 4 AWG (2 AWG for runs over 3 ft) | 150 to 200 A |
| 2000 to 3000 W | 2 AWG or 1/0 AWG | 250 to 300 A |
| 3000 to 5000 W | 1/0 AWG or larger | 300 to 400 A |
Keep inverter cables under 4 feet. Long, thin wires add resistance, and resistance means heat and voltage loss. Even a small drop matters at 100 A, and an inverter that sees low voltage at its terminals will alarm or shut down while the battery itself is fine. Victron’s DC wiring guide explains how cable size and length relate to voltage drop.
Grounding also matters. Ground the inverter according to its manual, because some manufacturers require chassis grounding for shock protection. Label the setup on tape near the battery (“150A Fuse / 4 AWG / 2000W”) to make fuse replacement easier.
Step-by-step: operating and plugging in the tool
Start the engine first, then plug the tool in with its switch off. Check this list before pulling the trigger:
- Engine is running and no warning lights are on the dash.
- Inverter fans are spinning and vents are clear.
- Voltage display shows about 13 V or higher (12.5 V is a battery-only reading, not a running one).
- Cables and terminals are tight and not warm to the touch.
Start the tool with no load on the blade or bit, then begin work. If something goes wrong, use this table:
| Problem | Possible cause | Fix |
|---|---|---|
| Tool won’t start | Inverter too small or surge rating too low | Upgrade to higher wattage |
| Inverter beeping | Low battery voltage | Start engine or charge battery |
| Inverter shuts down | Overload or overheating | Reduce load, improve ventilation |
How long can a car battery run a power tool before it goes flat?
With the engine off, roughly 30 to 40 minutes for typical combinations. The table assumes about 50% of battery capacity is usable and roughly 85% inverter efficiency.
| Tool power (W) | Battery (Ah) | Approx. runtime (battery only) |
|---|---|---|
| 500 W drill | 60 Ah | About 35 minutes |
| 1000 W grinder | 100 Ah | About 30 minutes |
| 1500 W saw | 200 Ah | About 40 minutes |
Worked runtime calculation
For the 500 W drill: usable energy is 60 Ah x 12 V x 50% = 360 Wh. Divide by the DC draw of about 588 W (500 W / 0.85) and you get roughly 0.61 hours, or about 37 minutes, which the table rounds to 35. Real tools cycle on and off, so actual time varies with how hard you work them.
With the engine running, the alternator offsets part of the draw, so runtime stretches for moderate tools. It is not unlimited: watch voltage and stop when it trends toward 12 V. Also try not to exceed 80% of inverter capacity continuously, and give it breaks between long cuts.
Use a generator or larger battery system instead if any of these apply:
- The startup surge is above the inverter’s peak rating, or running watts are above 80% of the continuous rating.
- The required cable and fuse would be larger than your vehicle’s wiring or battery can sensibly support.
- Battery voltage keeps falling below about 12 V with the engine running.
- You need hours of runtime, such as a compressor or a table saw on a full job.
What safety checks should I perform before and after using the inverter?
Run a quick check each time, and stop immediately if any warning sign appears.
Pre-use checklist
- Tool: cord undamaged, plug intact, switch off, nameplate watts noted.
- Inverter placement: secure, dry, vents clear, away from flammable materials.
- Polarity: red to positive, black to negative, confirmed twice.
- Fuse: correct rating, installed near the positive terminal, holder not melted or corroded.
- Cables: correct gauge, no fraying, terminals clean and tight.
- Ventilation: nothing stacked on or around the unit.
- Engine state: running for any load above light use.
Shutdown checklist
- Switch the tool off and unplug it.
- Switch the inverter off (it draws power even at idle), then stop the engine.
- Feel cables and terminals for heat, and check for loose connections or damaged insulation.
Stop-use warning signs
- Repeated overload or low-voltage alarms.
- Inverter housing or cables too hot to touch.
- Sparking, burning smell or melted insulation.
- Loose terminals or a frayed tool cord.
- Battery voltage sinking toward 12 V with the engine running.
Other habits: avoid moisture; check cables monthly; do not daisy-chain extension cords (use one short, heavy-gauge cord, 12 AWG is a common choice); and use a GFCI outlet or GFCI-protected cord outdoors or around metal structures, since it cuts power quickly on a ground fault. For job-site sizing advice, this guide to power inverters for tools and job sites is a useful second reference.
Upgrades that make a tool setup last
Use a dual-battery system
Running heavy tools from the battery that also starts the engine risks leaving you stranded. A second deep-cycle battery with an isolator keeps the main battery protected while the secondary one powers the inverter. Both charge while driving.
Add a watt meter or battery monitor
A watt meter shows exactly what your drill or saw pulls. A battery monitor warns when voltage dips, before the inverter alarms or you deeply discharge the battery. Owners value clear displays of input voltage, output wattage and fault status.
Make it easy for first-timers
- Color-code connections with tape (red positive, black negative).
- Label switches for inverter and tool power.
- Use Velcro mounts only for light inverters in low-vibration spots; bolt heavy units down.
- Keep a laminated card in the glove box with fuse ratings and wire sizes.
How do seasons and efficiency habits affect tool use?
| Season | Challenge | Quick fix |
|---|---|---|
| Summer | Overheating inverter | Shade and fan cooling help; avoid direct sunlight |
| Winter | Battery voltage drop | Keep batteries warm; use an insulated battery box |
| Rainy season | Moisture risk | Use waterproof enclosures and cover outlets |
- Turn off the inverter when idle, since even standby draws power.
- Use LED work lights instead of halogen ones.
- Keep terminals clean, because corrosion adds resistance.
- Avoid running multiple tools at once unless the combined running watts, plus the startup surge of whichever starts, fit within a 3000 W-plus inverter.
What do owners say?
Owners like
- Convenient temporary AC power for drills, chargers, lights and small tools away from mains electricity.
- Direct-battery models power substantially larger loads than accessory-socket models.
- Low-voltage, overload and over-temperature shutdowns are appreciated when they work reliably.
- Clear displays of input voltage, output wattage and fault status make troubleshooting easier.
Common complaints
- Unexpected shutdowns when motor tools produce startup surges.
- Short or undersized supplied cables that run hot or cause voltage-drop shutdowns.
- Cooling fans that are loud and run frequently under sustained loads.
- Drained vehicle batteries after forgetting to stop the inverter or engine.
- Modified-sine-wave output causing noise, heat or poor performance with some chargers and electronics.
Summarised from owner reviews and long-term user reports; individual experiences vary.
FAQs: readers often ask
Can I run heavy tools like an air compressor or table saw with a car inverter?
Sometimes, but only if the inverter is large enough (typically 3000 to 5000 W pure sine wave), the cables and fuse are sized for it, and the vehicle has a strong alternator and a deep-cycle battery. Many compressors and table saws have surges that make a generator the more practical choice. Lighter tools like drills or sanders are fine on smaller units.
Can I use the inverter while the car engine is off?
Technically, yes, but runtime is short because a standard battery drains quickly under tool loads. If you must, watch voltage closely and stop before it falls to about 12 V.
Is it okay to use an inverter on hybrid or EVs?
Some hybrids and EVs have built-in outlets or special circuits. Check your owner’s manual first. Never connect an inverter to the high-voltage traction battery; if you use one at all, it connects only to the 12 V auxiliary battery.
How do I know if my inverter is overloaded?
It will beep or shut down automatically. Look for warning lights, unplug one tool at a time, and let it cool before restarting.
What is the best way to keep the inverter lasting longer?
Keep it cool, clean and dry. Check wiring monthly, and avoid exceeding 80% of its rated load for continuous use.
Conclusion
Powering tools from a vehicle works when three things line up: an inverter rated above the tool’s startup surge, short fused cables straight to the battery, and sensible limits on runtime. Use the sizing table to match the tool, run the checklist each time, and stop at the first warning sign. When a job needs more than the inverter, wiring and battery can deliver, switch to a generator or a larger battery system rather than pushing the inverter past its limits.
Sources