
Small inverters up to about 150-300W can plug into a 12V accessory socket. Anything larger must be hard-wired to the battery with correctly sized cable, a fuse or breaker within about 7 inches (18 cm) of the battery positive terminal, and a short, solid ground. This guide shows how to size the parts, pick a location, wire it, and test it in a car, truck, RV or boat.
Quick answer
Plug in only if the inverter is about 300W or less. Above that, hard-wire it. Divide watts by about 10 to get DC amps, size the cable for that load, and fuse it at roughly 125% of that current, close to the battery.
- Best for laptops and chargers: plug-in unit, 150-300W
- Best for power tools and appliances: hard-wired, 1000W or more
- Best for long runtime: auxiliary battery with isolator
- Most 12V sockets are fused at about 10-20A, so they safely carry roughly 120-240W.
- DC current is about inverter watts divided by 10. A 1000W unit draws near 100A.
- The fuse protects the cable, not the inverter. Put it within 7 inches of the battery positive post.
- Keep DC voltage drop at 3% or less, or the inverter will shut down on low voltage.
- Large loads need the engine running or a separate deep-cycle battery.
- Plug-in or hard-wired?
- Tools and materials
- Where to mount the inverter
- Cable and fuse sizing chart
- Worked example: 1000W inverter
- Step-by-step hard-wired installation
- Battery, alternator and isolator
- Modified vs pure sine wave
- AC outlets, grounding and GFCI
- Testing and troubleshooting
- RVs, trucks and boats
- Installation checklist
- What do owners say?
- Frequently Asked Questions
Can I plug my inverter into the cigarette lighter, and what is the maximum wattage?
Yes, for small loads. Most vehicle 12V accessory sockets are fused at about 10-20A, which limits safe continuous power to roughly 120-240W at 12V. Many inverter makers recommend plug-in use at 150-300W or less. Check the fuse rating printed in your fuse box or owner’s manual before you trust the socket.
When do I need to wire the inverter directly to the battery?
Wire directly when the load is above what the socket fuse can carry. That means power tools, coffee makers, microwaves, hair dryers and most small appliances. The socket wiring is thin. Pull 40A through it and it heats up, blows the fuse, or melts.
| Setup | Typical watts | Use case | Notes |
|---|---|---|---|
| Plug-in | Up to 150-300W | Laptop, phone, camera chargers | Limited by socket fuse (10-20A) |
| Hard-wired to starter battery | 300-1500W | Tools, short appliance use | Run the engine for big loads |
| Hard-wired with isolator and auxiliary battery | 1000-3000W | Camping, work vans, RVs, boats | Protects the starter battery |
What tools and materials do I need?
- Inverter and its manual
- Copper battery cable (welding or marine-grade tinned cable is common), sized from the chart below
- Class T, ANL or MRBF fuse with holder, or a DC-rated circuit breaker
- Copper lugs and a hydraulic or heavy-duty crimper (hammer crimpers are a poor choice)
- Heat-shrink tubing with adhesive lining
- Wrench set, wire cutters, heat gun
- Grommets for any hole through sheet metal
- Multimeter
- Optional: remote on/off switch, GFCI outlet, battery disconnect switch
Where is the best place to mount the inverter in the vehicle?
Mount it in a dry, cool, ventilated spot as close to the battery as practical. Inverters turn some power into heat, and the cooling fan needs clear airflow.
- Ventilation: Leave several inches of clearance around the vents. Never bury it under blankets or cargo.
- Moisture: Keep it away from wet floors, wheel wells and open bilges.
- Fuel and fumes: Do not mount it near gasoline, propane or battery vent gases. Inverters can create sparks on startup.
- Cable length: Shorter DC cable means less voltage drop. A longer AC extension is far cheaper than a longer DC run.
- Secure it: Screw it to a solid surface so it cannot slide in a hard stop.

What size cable (AWG) and fuse do I need for 300W, 600W, 1000W, 2000W?
Size by DC amps, then by run length. DC amps are roughly watts divided by 10, which already allows for efficiency losses at 12V. The fuse is about 125% of that figure, and the cable must be rated at or above the fuse.
The chart below is my calculation using copper cable, a 12V system and a 3% voltage drop limit. The lengths are one-way, measured along the positive cable, and the calculation counts the matching negative cable too. For the thickest sizes I chose a gauge that also carries the current without overheating. Manufacturer charts take priority.
| Inverter | DC amps (approx.) | Fuse | AWG at 3 ft | AWG at 6 ft | AWG at 10 ft |
|---|---|---|---|---|---|
| 300W | 30A | 40A | 10 | 8 | 6 |
| 600W | 60A | 80A | 8 | 6 | 4 |
| 1000W | 100A | 125A | 4 | 4 | 2 |
| 1500W | 150A | 200A | 2 | 2 | 1/0 |
| 2000W | 200A | 250A | 1/0 | 1/0 | 2/0 |
| 3000W | 300A | 400A | 4/0 | 4/0 | 4/0 |
Need a longer run? Go up at least one gauge for every doubling of length. Do not guess. Thin cable wastes power as heat and drops voltage until the inverter’s low-voltage alarm sounds.
What size fuse or circuit breaker do I need and where does it go?
Use a fuse of about 125% of the inverter’s maximum continuous DC current. Install it in the positive line within about 7 inches (18 cm) of the battery positive terminal. This follows the ABYC E-11 7-inch rule common in marine and RV practice.
Here is the part many guides skip: the fuse protects the cable, not the inverter. If the cable shorts to metal, the battery can push hundreds of amps through it. The inverter has its own internal protection. The fuse stops a cable fire.
Running current and startup surge differ. Motors, compressors and some tools pull several times their rated watts for a moment. Pick the fuse from the inverter’s continuous rating, and make sure the fuse type tolerates brief surges. A slow-blow or breaker rated for DC is often the right call.
What does a worked example look like for a 1000W inverter?
From the Shop
Take a 1000W inverter at 87% efficiency on a 12V battery.
- DC current: 1000 ÷ 12 ÷ 0.87 ≈ 96A.
- Fuse: 96 × 1.25 = 120A, so choose the next standard size, 125A.
- Cable: 4 AWG copper for a run up to about 6 ft. For 10 ft, use 2 AWG.
- Runtime on a 100Ah lead-acid battery: only about 50Ah is usable. 50 ÷ 96 ≈ 0.52 hours, or about 30 minutes at full load.
Half an hour at full load is why big loads need the engine running or a larger battery bank.
How do I install a hard-wired inverter step by step?
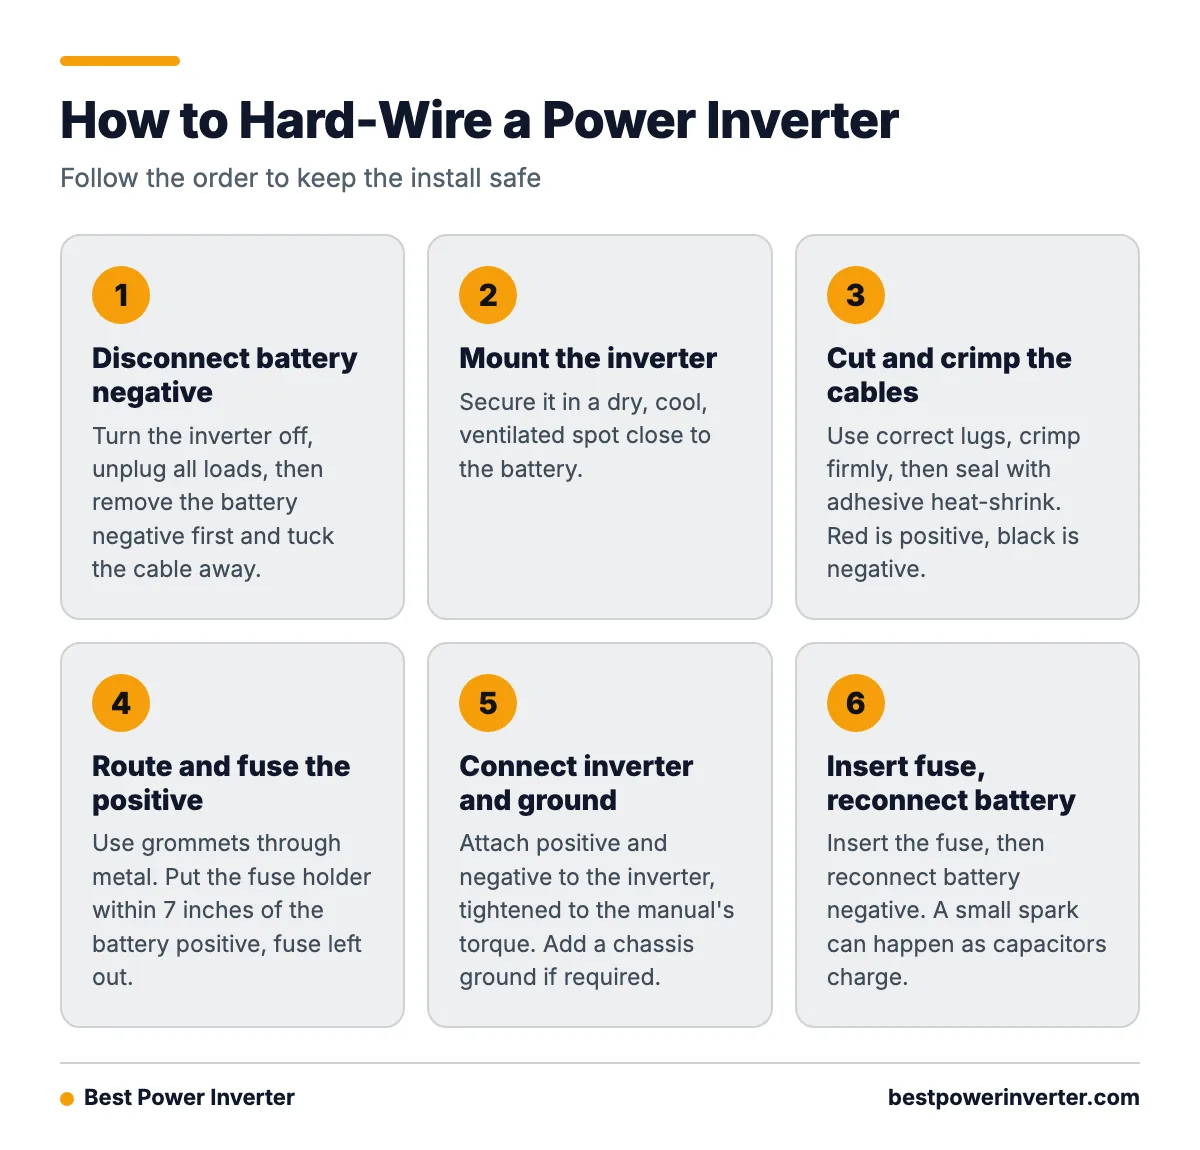
- Turn the inverter off and keep it unplugged from any load.
- Disconnect the battery negative terminal first. Tuck the cable away so it cannot touch the post.
- Mount the inverter in your chosen spot.
- Cut and crimp the cables. Use correct lugs, crimp firmly, then seal with adhesive heat-shrink. Red is positive, black is negative.
- Route the positive cable away from sharp edges, heat and moving parts. Use grommets through metal and secure it every foot or so.
- Install the fuse holder within 7 inches of the battery positive. Leave the fuse out for now.
- Connect the cable to the inverter’s positive terminal and the fuse holder. Tighten to the manual’s torque.
- Connect the negative cable to the inverter. The other end goes to battery negative, or to a bare-metal chassis point that is thick, clean and close.
- Add the chassis ground wire if the manual calls for one, using the gauge it specifies.
- Insert the fuse, then reconnect the battery negative. A small spark at first contact can happen as the inverter’s capacitors charge.
How do I connect the ground, and can I ground to the chassis?
Yes, a clean, bare-metal chassis point can serve as the DC negative path or as the safety ground, as long as the connection is solid and short. Sand off paint and rust, use a bolt and star washer, then seal against moisture. Running the negative straight to the battery negative post usually gives the lowest resistance. Ground the inverter case as its manual requires.

Should the engine be running, and do I need a second battery or isolator?
For loads over a few hundred watts, run the engine. A starter battery is built for short, high-current bursts, not long discharges. Running a big load with the engine off can drain it, leaving you unable to start.
For regular use of 1000W or more, add an auxiliary deep-cycle battery. Connect it through a battery isolator or a voltage-sensitive relay so the alternator charges both, while the inverter pulls only from the auxiliary. Check your alternator’s rated output too. It must cover the inverter’s load plus the vehicle’s own needs.
- Deep-cycle lead-acid: plan on using about 50% of its capacity.
- Low-voltage alarm: do not ignore it. It usually warns at the battery’s lower limits before shutdown, typically around 10-10.5V.
- Parked use: add a low-voltage disconnect so the starter battery is never emptied.
What is the difference between modified sine wave and pure sine wave for vehicle use?
Pure sine wave inverters make a clean waveform that suits laptops, medical devices, chargers and tools with motors. Modified sine wave units cost less but can cause buzzing, run motors hotter, or upset some chargers. For anything sensitive, choose pure sine. For simple heating loads and basic charging, modified sine can work. Owners often say pure sine units run laptops and tools quietly.
What about AC outlets, grounding and GFCI?
The AC side matters as much as the DC side. Use outlets and cord rated for the load, and keep AC extension cords short and thick. In damp places, such as boats, truck beds and RV exteriors, use a GFCI outlet.
Neutral-ground bonding is the part rarely explained. Some inverters connect AC neutral to ground internally, and some do not. If you add shore power or a transfer switch, only one point in the system should bond neutral to ground. Read your manual and follow it. If unsure, ask a qualified electrician. For general background on plug-in options, see this overview of car power inverters.
How do I test the installation and fix common problems?
- Check every connection by hand for tightness. Look for exposed copper.
- Measure battery voltage with the multimeter. It should read about 12.4-12.8V at rest.
- Turn on the inverter with no load. Confirm the display or LED is normal.
- Add a small load, then a larger one. Measure voltage at the inverter’s input terminals while loaded. A drop of more than about 3% (around 0.4V) points to thin cable or a poor connection.
- Feel the cables and lugs after 10-15 minutes of load. Warm is fine. Hot means a problem.
| Symptom | Likely cause | Fix |
|---|---|---|
| Low-voltage alarm under load | Voltage drop or weak battery | Shorten or thicken cable, start the engine, check battery |
| Fuse keeps blowing | Overload, short, or fuse too small | Cut the load, inspect wiring, re-check fuse math |
| Hot cable or lug | Undersized cable or loose crimp | Replace cable, re-crimp lug |
| Buzzing from audio gear | Modified sine wave | Switch to pure sine |
| Shuts down below rated watts | Overstated rating or surge load | Use a larger inverter or lower the load |
What mistakes cause fires or voltage drop?
- Fuse placed far from the battery, or no fuse at all
- Cable too thin for the amps or the length
- Crimps done with pliers or a hammer
- Painted or rusty ground point
- Cable rubbing on metal edges without a grommet
- Mounting in a sealed, hot compartment
- Daisy-chaining a big inverter onto existing thin wiring
Are there special notes for RVs, trucks and boats?
- RVs: Wire to the house battery bank, not the chassis battery. Use a battery disconnect and a properly sized breaker. Keep the inverter near the batteries.
- Trucks and work vans: Use an isolator if the inverter will run while parked. Secure the unit against vibration and keep it out of tool-bed moisture.
- Boats: Use tinned marine cable, a marine-rated fuse or breaker, and a GFCI. Mount high and dry, away from the bilge and fuel vapors. Follow ABYC practice.
Always read the maker’s instructions. For example, Eaton publishes an owner’s manual for its PowerVerter Plus inverters that shows how a manufacturer specifies mounting and wiring.
- Under 300W, short use: plug it in.
- 300-1500W, engine running: hard-wire to the starter battery.
- Over 1000W, engine off or daily use: hard-wire to an auxiliary battery with an isolator.
Installation checklist
Before you start
- Confirmed inverter watts and DC amps
- Chosen cable gauge for the real run length
- Fuse or breaker matched to the cable
- Mounting spot is dry, cool and ventilated
During wiring
- Battery negative disconnected
- Lugs crimped and sealed
- Fuse within 7 inches of battery positive
- Cables protected and secured
- Ground point clean and tight
After wiring
- Voltage checked at rest and under load
- Cables and lugs checked for heat
- GFCI tested if fitted
- Low-voltage behavior confirmed
What do owners say?
Owners like
- Hard-wiring to the battery with thick cable ends fuse blowing and cigarette lighter socket problems.
- Pure sine wave inverters run laptops, chargers and tools quietly, with no buzzing.
- A remote on/off switch makes a hard-wired inverter convenient.
- Built-in USB ports and quiet or temperature-controlled fans are appreciated.
Common complaints
- Cigarette lighter socket fuses blow when plugged-in inverters are overloaded.
- Cooling fans can be loud or run constantly.
- Cables included in kits are undersized, get hot or cause voltage drop.
- The low-voltage alarm trips, or the starter battery drains when the engine is off.
- Stated wattage ratings are overstated, and units shut down below their advertised capacity.
Summarised from owner reviews and long-term user reports; individual experiences vary.
Frequently Asked Questions
What is vehicle power inverter installation?
It is the process of connecting a DC-to-AC inverter to your vehicle’s 12V system so you can run household devices. Small units plug into the accessory socket. Larger units are wired to the battery with proper cable, a fuse near the battery and a solid ground.
Can I plug my inverter into the cigarette lighter, and what is the maximum wattage?
Yes, if it is small. Most sockets are fused at about 10-20A, which means roughly 120-240W of safe continuous power. Many makers recommend 150-300W or less for plug-in use.
When do I need to wire the inverter directly to the battery?
When the load goes above what the socket can carry, typically anything beyond about 300W. Tools, kitchen appliances and heaters all need a direct battery connection.
What size fuse or circuit breaker do I need and where does it go?
Use about 125% of the inverter’s maximum continuous DC current. For a 1000W unit that is around 125A. Mount it within 7 inches (18 cm) of the battery positive terminal.
Should the engine be running when I use the inverter, and will it drain my battery?
For anything over a few hundred watts, run the engine. A 1000W load can drain half of a 100Ah battery in about 30 minutes. Use a low-voltage disconnect or an auxiliary battery to protect the starter battery.
Do I need a second battery or isolator for a larger inverter?
For regular use of 1000W or more, yes. An isolator lets the alternator charge both batteries while keeping the starter battery safe from the inverter’s load.
Sources