
You cannot plug 12V straight into a 220V appliance. You need an inverter that turns battery DC into AC and steps it up with a transformer. An inversor 12v a 220v casero (a homemade 12V to 220V inverter) can run a few tens of watts of simple loads. For anything bigger or more sensitive, a store-bought inverter is safer and more efficient.
Quick answer
A DIY inverter built with a CD4047 chip, two MOSFETs and a 12-0-12V transformer makes square wave AC. It suits bulbs and small resistive loads up to roughly 50-150W. Buy a ready-made unit for chargers, laptops, fridges or tools.
- Best for learning: DIY CD4047 build, low power
- Best for power cuts: bought modified sine unit
- Best for electronics: bought pure sine unit
- 12V DC cannot power a 220V appliance directly. It must be switched into AC and stepped up.
- A simple DIY inverter outputs square wave, which can harm motors, chargers and sensitive electronics.
- Battery current is watts divided by 12, divided by efficiency. A 300W load pulls about 29A.
- Use a fuse on the battery cable, thick wire and a heat sink.
- Output above about 50V AC is a shock hazard. Treat it with respect.
- Beyond low-power experiments, buying is safer and often not much more expensive.
- Can I plug 12V into 220V?
- How does a 12V to 220V inverter work?
- What components do you need?
- How to make a basic inverter with a CD4047
- How many watts can a homemade inverter power?
- Square, modified sine and pure sine waves
- Battery size, current and cable thickness
- How long will a 12V battery run a 220V load?
- Safety risks and a pre-power checklist
- DIY or buy?
- Frequently Asked Questions
Can I plug 12V into 220V?
No. A 12V battery gives steady DC at low voltage. A 220V appliance expects AC that swings back and forth, 50 times a second in most of Europe and Latin America. Connecting the two does not work. At best nothing happens. At worst you damage the appliance or the battery.
Mains voltage depends on where you live. Most of Europe and Latin America uses 220-240V at 50Hz. North America uses 120V at 60Hz. Your inverter must match your region, so check the label on your appliance first.
How does a 12V to 220V inverter work, step by step?
An inverter makes AC by switching DC on and off very fast, then raising the voltage. Here is the chain:
- Oscillator: a chip such as the CD4047 or SG3525 creates a clock signal, about 50Hz for simple designs.
- Driver: the signal is made strong enough to turn power switches on and off.
- Switching stage: power MOSFETs connect the battery to the transformer, first one side, then the other.
- Transformer: it steps the low voltage up to around 220V AC.
Bigger inverters often use a high-frequency boost converter instead of a heavy 50Hz transformer. The idea stays the same: switch, then step up.

What components do you need to build a simple homemade inverter?
A basic build uses cheap, common parts:
- CD4047 CMOS astable multivibrator chip
- Two N-channel power MOSFETs (such as IRF3205 types)
- A transformer rated 220V to 12-0-12V, run in reverse
- A resistor and capacitor for timing, plus a trimmer to tune frequency
- Gate resistors and pull-down resistors
- A heat sink for the MOSFETs
- An inline fuse and thick battery cable
- An insulated enclosure with a switch
How do I make a basic inverter with a CD4047 or SG3525 and a transformer?
Wire the CD4047 so it free-runs, then let its two opposite outputs drive two MOSFETs. Each MOSFET switches one half of the transformer’s 12V winding to battery negative. The center tap goes to battery positive through a fuse.
Here is the flow:
- Set the CD4047 timing parts so the outputs run at 50Hz. A 100 kΩ trimmer with about 22 nF is a common starting point. Tune it with a frequency meter.
- Connect each output to a MOSFET gate through a small resistor. Add a pull-down resistor from each gate to ground.
- Connect each MOSFET drain to one end of the 12-0-12V winding. Connect the sources to battery negative.
- Connect the center tap to battery positive through the fuse.
- The original 220V winding now becomes your output.
The SG3525 works the same way. It has stronger drive outputs and built-in features like soft start and shutdown, so it suits higher power.
How many watts can a homemade inverter realistically power?
Realistically, 50 to 150W, and only for simple loads. Small parts, a modest transformer and basic drive circuits set the limit. Pushing past that causes hot MOSFETs, a hot transformer and early failure.
Good loads at this level are incandescent bulbs and small resistive heaters. Poor loads are anything with a motor, a power supply or electronics.
What is the difference between square wave, modified sine wave and pure sine wave?
The difference is the shape of the voltage. A pure sine wave is smooth, like grid power. A square wave jumps straight between high and low. A modified sine wave adds a pause step, so it is closer to a sine but still rough.
Square and modified sine outputs can cause heat, noise or damage in inductive loads and sensitive electronics. Pure sine units copy grid-like output. Your CD4047 build makes square wave.
| Device | Square wave |
|---|---|
| Incandescent bulb | Works |
| Resistive heater (small) | Works |
| Laptop or phone charger | Avoid: can overheat or fail |
| Fridge or freezer | Avoid: motor runs hot and noisy |
| Power tools and fans | Avoid: motors and inductive loads |
| Medical devices | Never use |
How do I choose the battery size and cable thickness for a given load?
Start with the current. Amps drawn from the battery equal watts divided by 12V, divided by efficiency. A 300W load at about 85% efficiency draws about 29A. That is a lot for a 12V system, so cables and fuses matter.
The table below uses 85% efficiency. Fuse and cable values are rule-of-thumb figures for short runs under about 1.5 m. Check your local wiring rules and your inverter’s manual before you copy them. For more on fuse placement in real installs, see this van inverter wiring guide.
| Load | Battery current | Suggested fuse | Cable (copper) | Runtime on 100Ah (50% usable) |
|---|---|---|---|---|
| 50W | about 5A | 10A | 1.5 mm² | about 10 hours |
| 100W | about 10A | 15-20A | 2.5 mm² | about 5 hours |
| 300W | about 29A | 40A | 6 mm² | about 1.7 hours |
| 600W | about 59A | 80A | 16 mm² | about 50 minutes |
Always fuse the positive cable close to the battery. A short in thick cable can melt insulation fast.

How long will a 12V battery run a 220V load?
Multiply volts by amp-hours to get watt-hours, then keep only the usable part. A 12V 100Ah battery stores about 1200Wh. Lead-acid should only be drained about 50%, so you get about 600Wh usable.
Worked example for a 300W load:
- Usable energy: 600Wh
- After about 85% inverter efficiency: about 510Wh reaches the load
- Runtime: 510 ÷ 300 = about 1.7 hours
Without losses the same math gives 2 hours. Real life is always a bit shorter. For deeper sizing help, a inverter sizing calculator can check your numbers.
What are the safety risks of building a mains-voltage circuit?
There are three: electric shock, fire and a battery short circuit. Mains voltage above about 50V AC is generally treated as hazardous, and currents of tens of milliamps through the body can be dangerous. Your inverter output is well above that line.
- Shock: the output side can hurt you even from a small battery. Never touch it while running.
- Fire: thin wire, hot MOSFETs and a loaded transformer can ignite nearby material.
- Short circuit: a car battery can deliver hundreds of amps. Without a fuse, cables can glow.
A simple DIY circuit also lacks protections that bought units have: low-voltage cutoff, overload shutdown and short-circuit shutdown. It may also give an output voltage that climbs well above 220V with no load.
Checklist before you power on
- Fit a fuse in the positive battery cable, close to the battery.
- Mount the MOSFETs on a heat sink, insulated if they share a tab.
- Check every solder joint and polarity twice.
- Put everything in a closed, insulated enclosure with no exposed output terminals.
- First test with a current-limited supply, or a 12V lamp in series with the battery. If the lamp glows bright with no load, stop and look for a fault.
- Test the output voltage with a meter rated for mains, with the load off.
- Start with a single bulb before anything else.
- If you only want to learn how inverters work, build the CD4047 circuit and run a bulb.
- If you need to run a phone charger, laptop or fridge, buy a pure sine inverter.
- If you need more than about 150W, buy a unit. Do not scale up the DIY board.
- If you are unsure about mains wiring, skip the build.
When is it better to buy an inverter instead of building one?
Buy whenever you need real power, steady voltage or safe use with electronics. A bought unit has tested protections and a proper case. Small bought inverters are often cheap enough that a DIY build only saves money if you already own the parts.
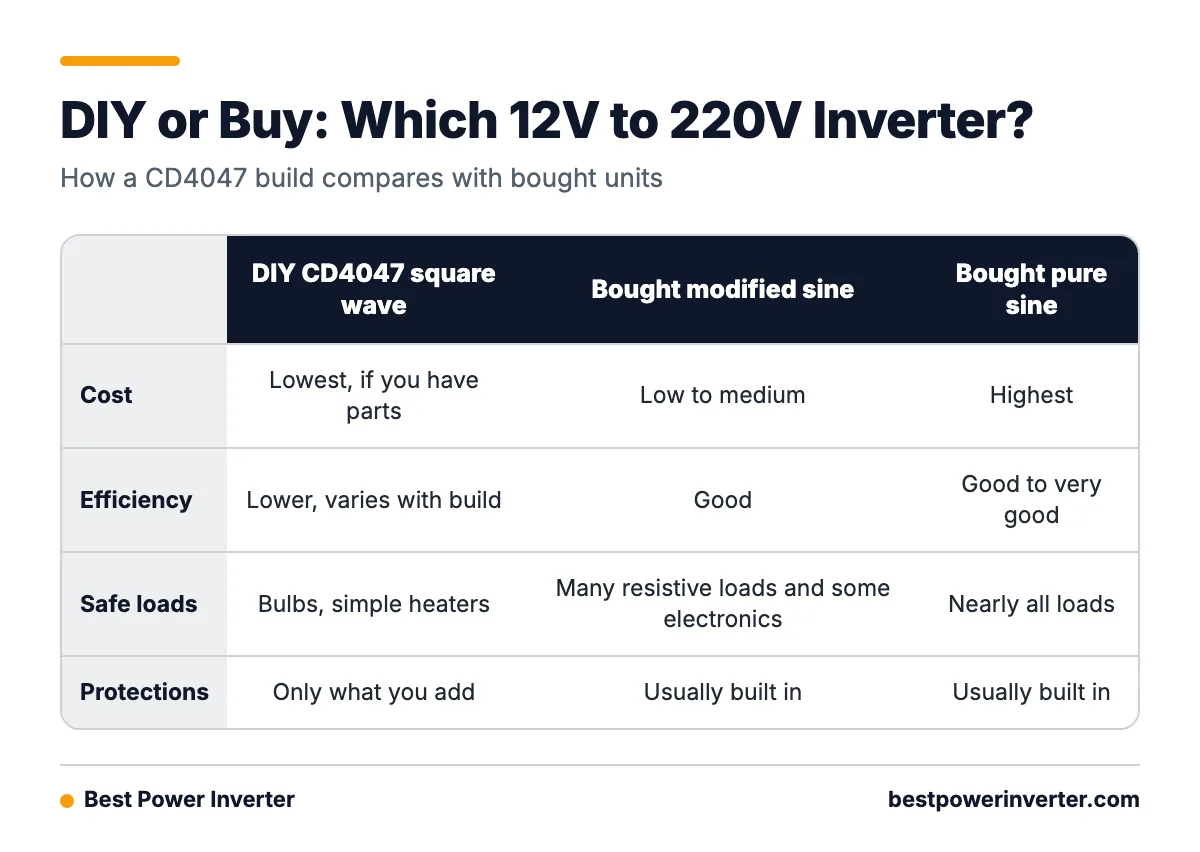
| Feature | DIY CD4047 square wave | Bought modified sine | Bought pure sine |
|---|---|---|---|
| Cost | Lowest, if you have parts | Low to medium | Highest |
| Efficiency | Lower, varies with build | Good | Good to very good |
| Safe loads | Bulbs, simple heaters | Many resistive loads and some electronics | Nearly all loads |
| Protections | Only what you add | Usually built in | Usually built in |
Prices change often, so check current listings. To pick the right size, this off-grid inverter sizing article explains how to add up loads and battery needs.
Other options
- Cigarette lighter inverter: small, plug-in, good for a laptop or phone charger in the car. Check its watt rating.
- 12V or USB native devices: skip the inverter entirely. Many lights, fans and chargers run straight from 12V and waste less energy.
Frequently Asked Questions
Inversor 12v 220v casero: is it worth building one?
It is worth it as a learning project. You will understand oscillators, MOSFET switching and transformers. It is not worth it as a power source for real appliances. Output is usually square wave, power is limited to tens of watts, and protections are missing.
How to convert 12v into 220v?
Use an inverter. It turns the 12V DC into switched pulses with an oscillator and MOSFETs, then a transformer or boost converter raises the voltage to about 220V AC. Pick a pure sine unit for electronics, or a simple one for bulbs.
Can I plug 12v into 220v?
No. Connecting a 12V source straight to a 220V appliance does nothing useful and can damage equipment. The voltage is wrong, and DC is not AC. You need an inverter between them.
How to convert 12v to 220v?
The steps are: make a 50Hz drive signal, switch the battery through the 12-0-12V half of a transformer with two MOSFETs, and take the 220V from the other winding. Add a fuse, a heat sink and an enclosure. Keep loads small and simple.
Inversor 12v a 220v casero: how many watts can it run?
Plan on 50 to 150W for a basic CD4047 build, and stay under the transformer’s VA rating. A 300W load would pull about 29A from the battery, which this kind of board is not made for. For that, buy a proper inverter.
Sources