
If you own an RV or camper, you know how important your inverter is for keeping your lights on and devices charged while on the road. But what happens when your inverter stops working properly?
You might notice flickering lights, dead batteries, or strange noises that can throw off your entire trip. Don’t worry—these common inverter problems have simple fixes that you can handle yourself. You’ll discover easy troubleshooting tips and practical solutions to get your power back quickly.
Keep reading to make sure your RV adventures never lose their spark due to inverter issues.
Rv Inverter Basics
Understanding the basics of an RV inverter is essential for every camper owner. An inverter changes the power from your RV’s batteries into usable electricity for your devices. Without it, many appliances and electronics won’t work when you are off-grid. Knowing how it functions helps you identify problems and fix them quickly.
Inverter Vs Converter
Many people confuse inverters with converters, but they serve different purposes. A converter changes AC power from shore power or a generator into DC power to charge your batteries.
An inverter does the opposite. It converts DC power stored in your batteries into AC power for your appliances. Both work together to keep your RV powered.
How Inverters Work In Campers
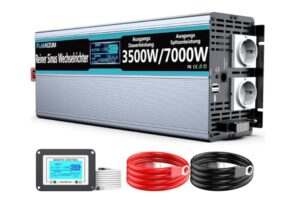
Inverters take the 12-volt DC power from your RV batteries and turn it into 120-volt AC power. This is the type of power needed for most household appliances. The inverter uses electronic circuits to perform this change. It allows you to run TVs, microwaves, and other devices even without shore power. This is especially useful during camping or traveling in remote areas.
Common Inverter Issues
Inverters play a vital role in powering your RV or camper. They convert DC battery power into usable AC electricity. Common issues can disrupt this power flow and cause inconvenience. Knowing these problems helps you fix them quickly and keep your trip smooth. Here are some frequent inverter problems and simple ways to identify them.
No Ac Power Output
The inverter may fail to provide AC power to your outlets. This issue often results from blown fuses or loose wiring. Sometimes, the batteries might be too low to supply power. Testing the output voltage with a multimeter can confirm the problem. Fix wiring and replace blown fuses to restore power.
Flickering Or Dimming Lights
Lights connected to the inverter may flicker or dim unexpectedly. This happens due to unstable power output or weak batteries. Loose connections or overloaded circuits also cause flickering. Tighten all connections and reduce the load on the inverter. Ensure your batteries are fully charged for steady power.
Rapid Battery Drain
A faulty inverter can drain your batteries faster than normal. This issue occurs if the inverter runs even when not in use or if it has internal faults.
Check for any standby power consumption by the inverter. Use a battery monitor to track discharge rates. Repair or replace the inverter if it causes excessive drain.
Overheating And Noise
Inverters may become hot or produce unusual sounds like buzzing or whirring. Overheating happens from poor ventilation or high loads.
Noises often indicate internal electrical problems. Keep the inverter in a cool, well-ventilated area. Reduce the load and inspect for damaged components. Stop using the inverter if it overheats repeatedly.
Error Codes And Display Warnings
Many modern inverters show error codes or warnings on their display panels. These codes point to specific faults like overload, low voltage, or temperature issues. Refer to your inverter’s manual to decode these messages. Address the exact problem the code indicates. Ignoring these warnings can cause permanent damage.
Read More: How To Make Power Inverter 12V to 220V at Home
Tools For Inverter Troubleshooting
Having the right tools makes inverter troubleshooting easier for RV and camper owners. These tools help identify issues quickly and safely. Basic tools provide clear information about the inverter’s condition.
They also allow simple fixes without costly repairs. Understanding how to use these tools saves time and effort.
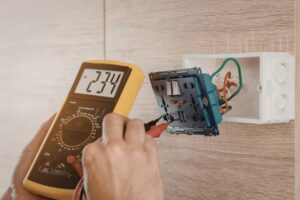
A digital multimeter is essential for checking electrical problems. It measures voltage, current, and resistance accurately. You can test battery voltage and inverter output with it. Set the multimeter to the correct mode before testing. Always follow safety rules to avoid electric shock. This tool helps find faults like broken wires or dead batteries.
Checking Connections And Fuses
Loose or corroded connections cause many inverter problems. Inspect all wires and terminals for tightness and cleanliness. Fuses protect the system from overcurrent. Check fuses for signs of damage or burning. Replace blown fuses with the same rating only. Good connections and fuses keep the inverter running smoothly and safely.
Reading Voltage Levels
Measuring voltage is a quick way to spot inverter issues. Use the multimeter to check battery voltage first. Then check the inverter’s output voltage at the power outlets. Normal battery voltage is about 12.6 volts when fully charged. The inverter output should match household voltage, usually 110-120 volts. Low or no voltage indicates a problem in the system.
Step-by-step Troubleshooting
Troubleshooting your RV or camper inverter can feel tricky. Follow clear, simple steps to find common problems. Start by checking the power going into the inverter. Then, test the power output to see if the inverter works correctly.
Listen carefully for any warning sounds. These sounds often signal specific issues. Finally, reset the GFI switches to clear minor faults and restore power. Each step helps you pinpoint problems fast and keep your power steady on the road.
Verifying Input Power
Check the power source feeding your inverter first. Use a digital multimeter to measure voltage at the battery or shore power connection. The voltage should match your inverter’s requirements. Low or no voltage means a problem before the inverter. Check battery connections and fuses to fix input power issues.
Testing Output Voltage
Turn on the inverter and measure the AC voltage at its outlets. Use a multimeter set to AC volts for accuracy. The reading should match your inverter’s rated output, usually 110 or 120 volts. No or low voltage means the inverter may be faulty or overloaded. Repeat the test with different appliances to isolate the problem.
Listening For Audible Warnings
Inverters often emit beeps or buzzes to signal trouble. Listen closely while the inverter runs. Rapid beeping can mean overload or low battery voltage. Continuous buzzing may indicate internal faults or overheating. These sounds help diagnose problems quickly. Check your inverter manual to match warning sounds with issues.
Resetting Gfi Switches
GFI switches protect your inverter from electrical faults. They may trip and cut power during faults or moisture exposure. Locate the GFI switch on your inverter or outlet panel. Press the reset button firmly to restore power. If the switch trips again, investigate wiring or moisture problems. Resetting often clears minor faults and restores safe operation.
Common Faults And Fixes for Power Inverter
Inverters are vital for powering your RV or camper appliances. They can face common faults that stop them from working correctly. Understanding these issues helps you fix problems quickly. Below are frequent inverter faults and how to repair them.
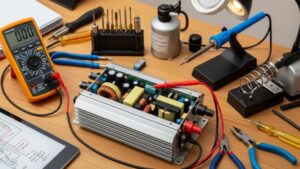
Switching Power Supply Damage
The switching power supply controls the inverter’s power flow. Damage to this part can cause the inverter to stop working or work inconsistently. Signs include no power output or strange noises. Fixing this usually means replacing the damaged supply or checking for blown fuses. Always disconnect power before inspecting.
Short Circuit Load Issues
A short circuit happens when wires or devices connect incorrectly, causing too much current flow. This can trip the inverter’s protection or blow fuses. To fix, remove all loads and reconnect them one at a time. Check cables and devices for damage. Replace any faulty parts to prevent future shorts.
Loose Or Corroded Connections
Loose or corroded wires reduce power flow and cause inverter failure. Check all battery terminals, input, and output wires regularly. Tighten loose connections and clean corroded contacts with a wire brush. Good connections ensure stable power and extend inverter life.
Battery-related Problems
Batteries power the inverter, so weak or damaged batteries cause poor performance. Check battery voltage and charge levels. Replace old or faulty batteries to maintain steady power. Keep battery terminals clean and secure to avoid connection issues that affect inverter function.
Preventive Maintenance Tips
Preventive maintenance keeps your RV inverter working well. It helps avoid sudden failures and costly repairs. Simple care routines extend the inverter’s lifespan and improve safety.
Check your inverter regularly and clean it often. Proper battery care also supports smooth inverter operation. Follow these tips to keep power flowing in your camper.
Regular Inspection Routines
Inspect your inverter every few weeks. Look for loose wires and damaged parts. Check mounting screws and electrical connections. Tighten any loose screws to avoid sparks. Listen for unusual noises like buzzing or humming. These sounds may signal internal problems. Early detection prevents bigger issues. Write down inspection dates and findings. This habit helps track your inverter’s health over time.
Cleaning And Cooling Strategies
Dust and dirt can block inverter vents. Blocked vents cause overheating and shutdowns. Clean vents and fans with a soft brush or compressed air. Avoid water or liquid cleaners. Place your inverter in a cool, ventilated spot. Avoid direct sunlight or heat sources. Use fans if needed to improve airflow. Keeping the inverter cool improves efficiency and lifespan.
Battery Care For Longer Life
Healthy batteries support your inverter’s power. Check battery terminals for corrosion and clean them with a baking soda mix. Ensure batteries stay fully charged. Avoid deep discharges as they shorten battery life.
Use a quality charger matched to your battery type. Test battery voltage regularly with a multimeter. Replace old or weak batteries promptly to protect your inverter from damage.
When To Call A Professional
Knowing when to call a professional for inverter problems is important. Simple issues can be fixed by RV owners. Some problems need expert skills to avoid damage or injury. This section helps you decide the right time to seek help.
Complex Electrical Faults
Inverter issues with wiring or internal circuits can be tricky. Faults causing frequent tripping or no power might need expert tools. Professionals understand complex diagrams and can test safely. Avoid guessing with electrical faults beyond basic checks.
Replacing Inverter Components
Replacing parts like circuit boards or transformers requires skill. Incorrect installation can cause more damage or void warranties. A technician has the right parts and knowledge. They ensure the inverter works properly after repair.
Safety Considerations
Inverters handle high voltage and currents. Mistakes can cause shocks, fires, or damage to your RV’s electrical system. Professionals follow safety rules and use protective gear. Don’t risk personal safety or your camper’s electrical health.
Conclusion
Troubleshooting your RV inverter can save time and money. Simple checks often fix common problems fast. Keep your connections clean and batteries charged. Watch for signs like flickering lights or strange noises. Use a multimeter to test voltage safely. Knowing basic fixes helps keep your camper powered on trips.
Regular maintenance prevents bigger issues later. Stay prepared and enjoy your travels without power worries.