What It Means to Use a Car Inverter for Power Tools
Have you ever been halfway through a job and thought, “Man, if only I could plug my power tools right into my car!” Well, you actually can—and it’s easier than you might think.
Using a car inverter for power tools simply means converting your car’s DC battery power into AC electricity, the same kind that comes from your wall outlets at home. Once connected properly, you can run drills, saws, or even air compressors straight from your vehicle.
Why is this idea catching on? Because it’s incredibly practical for contractors, handymen, van lifers, and DIYers who often work far from electrical outlets. Imagine being at a remote site, needing to finish a deck or fence, and not worrying about running cords for miles. That’s freedom—and that’s the promise of mastering inverter use.
By the end of this article, you’ll know exactly how inverters work, how to match one to your tools, and how to use it safely without draining your battery or frying your gear.
How a Car Power Inverter Works
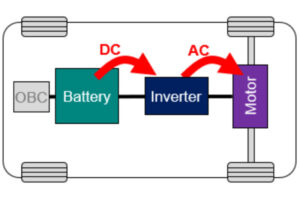
Think of an inverter as a translator between your car’s battery and your power tools. Your vehicle’s electrical system stores energy as 12 V DC (direct current), while your tools demand 120 V AC (alternating current). The inverter converts one into the other, so both sides can “speak the same language.”
Here’s a quick breakdown:
| Component | Function | Notes |
|---|---|---|
| Car Battery (DC) | Supplies the main energy source | Should be healthy and fully charged |
| Power Inverter | Converts DC → AC | Rated by wattage and waveform |
| Power Tool | Consumes AC electricity | May need surge wattage when starting |
| Vehicle Alternator | Recharges battery while running | Keeps inverter powered for longer use |
Most people overlook one crucial detail: waveform type. There are two main kinds of inverters:
-
Modified Sine Wave: Cheaper and fine for small electronics, but can make power tools run hotter or noisier.
-
Pure Sine Wave: Costs more, but it delivers clean, smooth power—better for sensitive or motor-driven tools like grinders or circular saws.
Personally, I’d go with pure sine wave every time for serious tools. It’s like feeding them premium gas instead of cheap stuff—they just run better and last longer.
And if you’re wondering, “Can my car really handle that?”—yes, it can, within limits. The inverter draws power directly from your battery and alternator, so you’ll need to balance wattage carefully (more on that in Section 2).
Typical Power Demands of Power Tools
Let’s be honest: not every tool is created equal when it comes to power draw. Some sip energy; others gulp it like an energy drink on a Monday morning.
Here’s a quick comparison of average power demands for common tools (based on manufacturer data and Statista’s average usage figures for corded tools in 2024):
| Power Tool | Continuous Power (W) | Surge/Startup Power (W) | Recommended Inverter (min.) |
|---|---|---|---|
| Corded Drill | 600 | 900 | 1000 W |
| Circular Saw | 1200 | 2400 | 2500 W |
| Angle Grinder | 900 | 1800 | 2000 W |
| Jigsaw | 400 | 600 | 800 W |
| Shop Vacuum | 1000 | 2000 | 2500 W |
| Air Compressor (small) | 1500 | 3000 | 3500 W |
(Source: Statista – Power Tool Market Data, 2024)
Notice those surge ratings? That’s why your “1000 W inverter” sometimes can’t start a 900 W drill—the brief spike during startup can exceed the inverter’s capacity. Always pick one rated for 30–50 % more than your tool’s running wattage.
Why Your Vehicle Setup Matters
You can have the best inverter money can buy, but if your vehicle’s battery and wiring aren’t up to the task, you’ll be left with dead batteries—or worse, melted cables.
Here’s what actually matters:
-
Battery Capacity:
A typical car battery (~60 Ah) can run a small drill for maybe 30 minutes before voltage dips too low. For heavy tools, you’ll want a deep-cycle or auxiliary battery. -
Alternator Output:
The alternator recharges your battery as the engine runs. If you’re pulling more power than it can supply, your battery drains anyway. So yes—keep the engine running for high-watt tools. -
Cable Gauge:
The thicker the cable, the less resistance. Undersized cables create heat and power loss. Use 4 AWG or thicker for inverters over 1000 W. -
Ventilation & Mounting:
Inverters get hot, especially when pushed to their limit. Mount them in a cool, ventilated area—not under your seat next to a coffee spill.
| Vehicle Component | Ideal Setup for Tool Use |
|---|---|
| Battery | Deep-cycle or dual setup |
| Alternator | 100 A or higher output |
| Cables | 4 AWG minimum for >1000 W |
| Fuse | Inline 100–150 A for safety |
| Engine | Keep running for continuous use |
And here’s a fun fact: according to EnergySage 2024 data, every 1000 W drawn from your car battery equals roughly 1 HP of engine load. So running a big saw off your inverter literally makes your engine work harder—like towing an invisible trailer.
Quick Recap
By now, you know:
-
What a car inverter does.
-
How it converts DC to AC for your tools.
-
Why pure sine wave models are worth it.
-
Which vehicle setup supports safe tool operation.
Pretty cool, right? But you might still be wondering—how exactly do you hook it all up? What cables? What wattage? How do you know if your alternator can handle it?
That’s where Section 2 comes in. We’ll walk through the step-by-step setup, from choosing the right inverter size to connecting it safely without frying your drill or killing your battery.
Step-by-Step Guide: Connecting Your Inverter the Right Way
Okay, let’s roll up our sleeves. You’ve got your power inverter, a couple of cables, and your favorite power tool sitting nearby. Now what?
Before anything, here’s a truth bomb: most inverter failures come from poor connections or wrong wire sizes, not from the inverter itself. So a clean, secure setup is half the battle.
Let’s go step-by-step.
Step 1: Choose the Right Inverter
Think of inverter choice like matching shoes to an outfit — you want the right fit for the job.
Here’s what to check before buying:
| Tool Power Rating | Minimum Inverter Size | Recommended Type |
|---|---|---|
| Up to 800 W | 1000 W inverter | Modified Sine Wave (for drills, lights) |
| 800–1500 W | 2000 W inverter | Pure Sine Wave (for saws, grinders) |
| 1500–3000 W | 3000–5000 W inverter | Pure Sine Wave, heavy-duty only |
If you’re unsure, always round up the wattage. A 1200 W circular saw needs an inverter that can handle at least 2000 W continuous and 3000 W surge.
Personal tip: I’d always go pure sine wave for anything with a motor -they run smoother and make less noise.
Step 2: Mount the Inverter Safely
Next up — placement. Where you mount it matters more than you might think.
-
Avoid hot spots like the engine bay.
-
Keep it ventilated — those cooling fans need breathing space.
-
Mount it flat and firm to avoid vibration damage.
-
Stay close to the battery (within 3–4 feet ideally) to reduce voltage drop.
Here’s a visual way to remember:
“Short cables, cool air, firm mount — inverter care 1-2-3.”
If you’re working from a van or truck, the trunk or under a rear seat (with airflow vents) is perfect.
Step 3: Connect the Wires
Now, the part that most people rush — the wiring. Let’s keep it simple but safe.
You’ll Need:
-
Positive (+) cable — red, thick, insulated.
-
Negative (–) cable — black, equally thick.
-
Inline fuse holder (within 12 inches of the battery).
-
Ring terminals for tight connections.
Wiring Steps:
-
Connect the red cable to the inverter’s positive terminal.
-
Attach the other end to the battery’s positive post, but don’t tighten yet.
-
Install a fuse (100–150 A) inline before the battery.
-
Connect the black cable from inverter’s negative terminal to the battery’s negative post.
-
Tighten all terminals — snug, not overtight.
Here’s a quick wiring reference table:
| Inverter Power | Recommended Cable Gauge | Fuse Size |
|---|---|---|
| 500–1000 W | 6 AWG | 80–100 A |
| 1000–2000 W | 4 AWG | 100–150 A |
| 2000–3000 W | 2 AWG | 150–200 A |
| 3000–5000 W | 1/0 AWG | 250–300 A |
Pro tip: Always double-check polarity before turning it on. Reversing connections can fry your inverter in seconds — and void the warranty.
Step 4: Start the Engine Before Powering Tools
Here’s the part many DIYers skip — and regret later.
You should always start your vehicle’s engine before plugging in your power tools. Why?
Because your alternator needs to feed the inverter while your tool runs. If you run it off the battery alone, you’ll drain it in minutes.
Think of it like running a treadmill while someone refills your water bottle — that alternator keeps your system alive.
When the engine’s running, voltage stays stable around 13.8–14.4 V, keeping your inverter happy and efficient.
Step 5: Plug In Your Power Tools
Now the fun part — plug your power tool into the inverter’s AC outlet just like you would at home.
But before hitting the trigger, do this quick checklist:
✅ Engine is running
✅ No warning lights on dash
✅ Inverter fans are spinning
✅ Voltage display shows 12.5 V or higher
Then go for it! Your tool should start up instantly.
If it doesn’t, don’t panic. Check for these common issues:
| Problem | Possible Cause | Fix |
|---|---|---|
| Tool won’t start | Inverter too small | Upgrade to higher wattage |
| Inverter beeping | Low battery voltage | Start engine / charge battery |
| Inverter shuts down | Overload or overheating | Reduce load / improve ventilation |
How Long Can You Run Power Tools on an Inverter?
It depends on three things — tool wattage, battery size, and alternator output.
Here’s a ballpark estimate for continuous runtime if the engine is idling:
| Tool Power (W) | Battery (Ah) | Approx Runtime |
|---|---|---|
| 500 W drill | 60 Ah | 1 hour |
| 1000 W grinder | 100 Ah | 40 minutes |
| 1500 W saw | 200 Ah | 1 hour+ (with alternator assist) |
Remember, the alternator helps recharge as you run the engine, so your “runtime” really becomes unlimited for moderate tools — as long as the engine stays on.
Still, try not to exceed 80% of inverter capacity continuously. Give it breathing breaks to prevent overheating.
Safety & Maintenance Tips
You know the saying: “Safety isn’t expensive, it’s priceless.”
Here are simple but life-saving habits to build:
-
Never use inverters in enclosed areas — carbon monoxide from your car’s exhaust is deadly.
-
Avoid moisture — keep tools and inverter dry.
-
Check cables monthly for fraying or heat marks.
-
Don’t daisy-chain extension cords — it increases resistance and voltage drop.
-
Use proper grounding when operating in damp areas or around metal structures.
And one more personal note — I like to label my inverter setup (“100A Fuse / 4 AWG / 2000W”) on masking tape near the battery. Makes troubleshooting way easier later.
Hidden Tricks Most People Don’t Know
Let’s be honest — anyone can connect a car inverter.
But making it run smoothly and safely for months? That’s where the smart ones stand out.
Here are a few tricks seasoned van-lifers, contractors, and mobile DIYers swear by:
1. Use a Dual-Battery System
Running tools straight from one car battery is like running a marathon on half a sandwich.
Install a second deep-cycle battery with an isolator — this lets your main battery stay safe for starting the engine while the secondary one powers your inverter.
⚙️ Bonus: You can charge both when driving and use only the auxiliary one when parked.
2. Add a Watt Meter or Battery Monitor
Ever wonder how much power your drill actually pulls? A watt meter answers that instantly.
It helps track load and warns when the battery voltage dips too low — before your inverter starts screaming.
It’s like a dashboard for your power flow — and trust me, once you use it, you’ll never go blind again.
3. Don’t Ignore Waveform Quality
This one’s sneaky.
Pure sine wave inverters may cost more, but they protect your tool motors from weird vibrations or heat buildup.
According to EnergySage (2024), pure sine wave systems are up to 15% more efficient for AC tools than modified sine wave models. That’s smoother starts and longer motor life.
4. Keep Cables Short & Thick
Here’s the thing — electricity hates long, skinny wires.
Every extra foot adds resistance, and resistance means heat and voltage loss.
Rule of thumb:
Keep inverter cables under 4 feet and use thick gauge wires (4 AWG or thicker) for anything above 1000 W.
It’s simple physics — shorter, thicker cables = happier tools.
Accessibility Tips — Making It Work for Everyone
Not everyone’s a mechanic or electrician. So, if you’re setting this up yourself, here’s how to make it user-friendly and safe even for first-timers:
-
Color-code connections with tape (red = positive, black = negative).
-
Label switches — one for inverter, one for tool power.
-
Use Velcro mounts instead of screws for easy repositioning.
-
Keep a laminated quick-start guide inside your glove box with fuse ratings and wire sizes.
A little organization makes you feel like you’re running a mini power station instead of a mess of wires.
Seasonal Use & Environmental Tips
Running your inverter in summer heat or winter frost? Each season brings quirks.
| Season | Challenge | Quick Fix |
|---|---|---|
| Summer | Overheating inverter | Shade + fan cooling helps; avoid direct sunlight. |
| Winter | Battery voltage drop | Keep batteries warm; use insulated battery box. |
| Rainy Season | Moisture risk | Use waterproof enclosures and cover outlets. |
Also, if you’re working outdoors — say, at a job site or campsite — use GFCI outlets or extension cords with built-in surge protection. That small step could save your tools and your inverter.
Energy Efficiency Tips
Want to squeeze every watt from your setup? Try these:
-
Turn off the inverter when idle — even standby draws power.
-
Use LED work lights instead of halogen ones.
-
Keep terminals clean — corrosion wastes power.
-
Avoid running multiple tools at once unless you’ve got a 3000 W+ inverter.
Fun fact: According to Statista (2024), efficient tool and inverter setups can save users up to 20% in battery consumption per use session — which means more runtime and less stress on your alternator.
Source: Statista, “Portable Power Efficiency Trends, 2024”
FAQs: Readers Often Ask
Q1. Can I run heavy tools like an air compressor or table saw with a car inverter?
Yes — but only if your inverter is powerful enough (3000–5000 W pure sine wave) and your car has a strong alternator. Lighter tools like drills or sanders are fine on smaller units.
Q2. Can I use the inverter while the car engine is off?
Technically, yes — but your runtime will be short. Without the engine, your battery drains fast. Always start the engine before using heavy tools.
Q3. Is it okay to use an inverter on hybrid or EVs?
Some hybrids and EVs have built-in inverters or special circuits. Check your owner’s manual first — connecting directly to the traction battery can be dangerous.
Q4. How do I know if my inverter is overloaded?
You’ll hear beeping or the inverter will shut down automatically. Look for warning lights and unplug one tool at a time.
Q5. What’s the best way to keep the inverter lasting longer?
Keep it cool, clean, and dry. Check wiring monthly, and never exceed 80% of its rated load for continuous use.
Conclusion: Turn Your Vehicle Into a Mobile Power Station
So, there you have it — from choosing the right inverter to mastering safe setup, and even optimizing for seasons, you’re now equipped to power your tools anywhere.
Remember this simple formula:
Right inverter + clean setup + common sense = portable power freedom.
Using a car inverter for power tools isn’t just convenient — it’s empowering. Whether you’re a traveling contractor, an RV hobbyist, or just someone who hates power outages, this setup gives you true independence.
So next time you’re out fixing something miles from an outlet, smile — because your car just became your workshop.